I created a weather app with Lightning Web Components, to avoid looking out the window
Hey! I am a nerd. I enjoy finding new ways of building some new developments, and I have to confess. This hobby is taking me some time. So, to avoid looking out the window and keep focus, I needed this app, and I am really proud of this one. Every time I connect to Salesforce and I am on my Home page, I can see what is the weather like, without moving from my chair, or asking Google(even this one is not really an argument: to get some information about the weather, my LWC has to ask to an API, so it’s the same…the difference is that, with my development, I’ve automated all this process). So, if you want to see how I did, keep reading!
Step 0: Before we begin this development
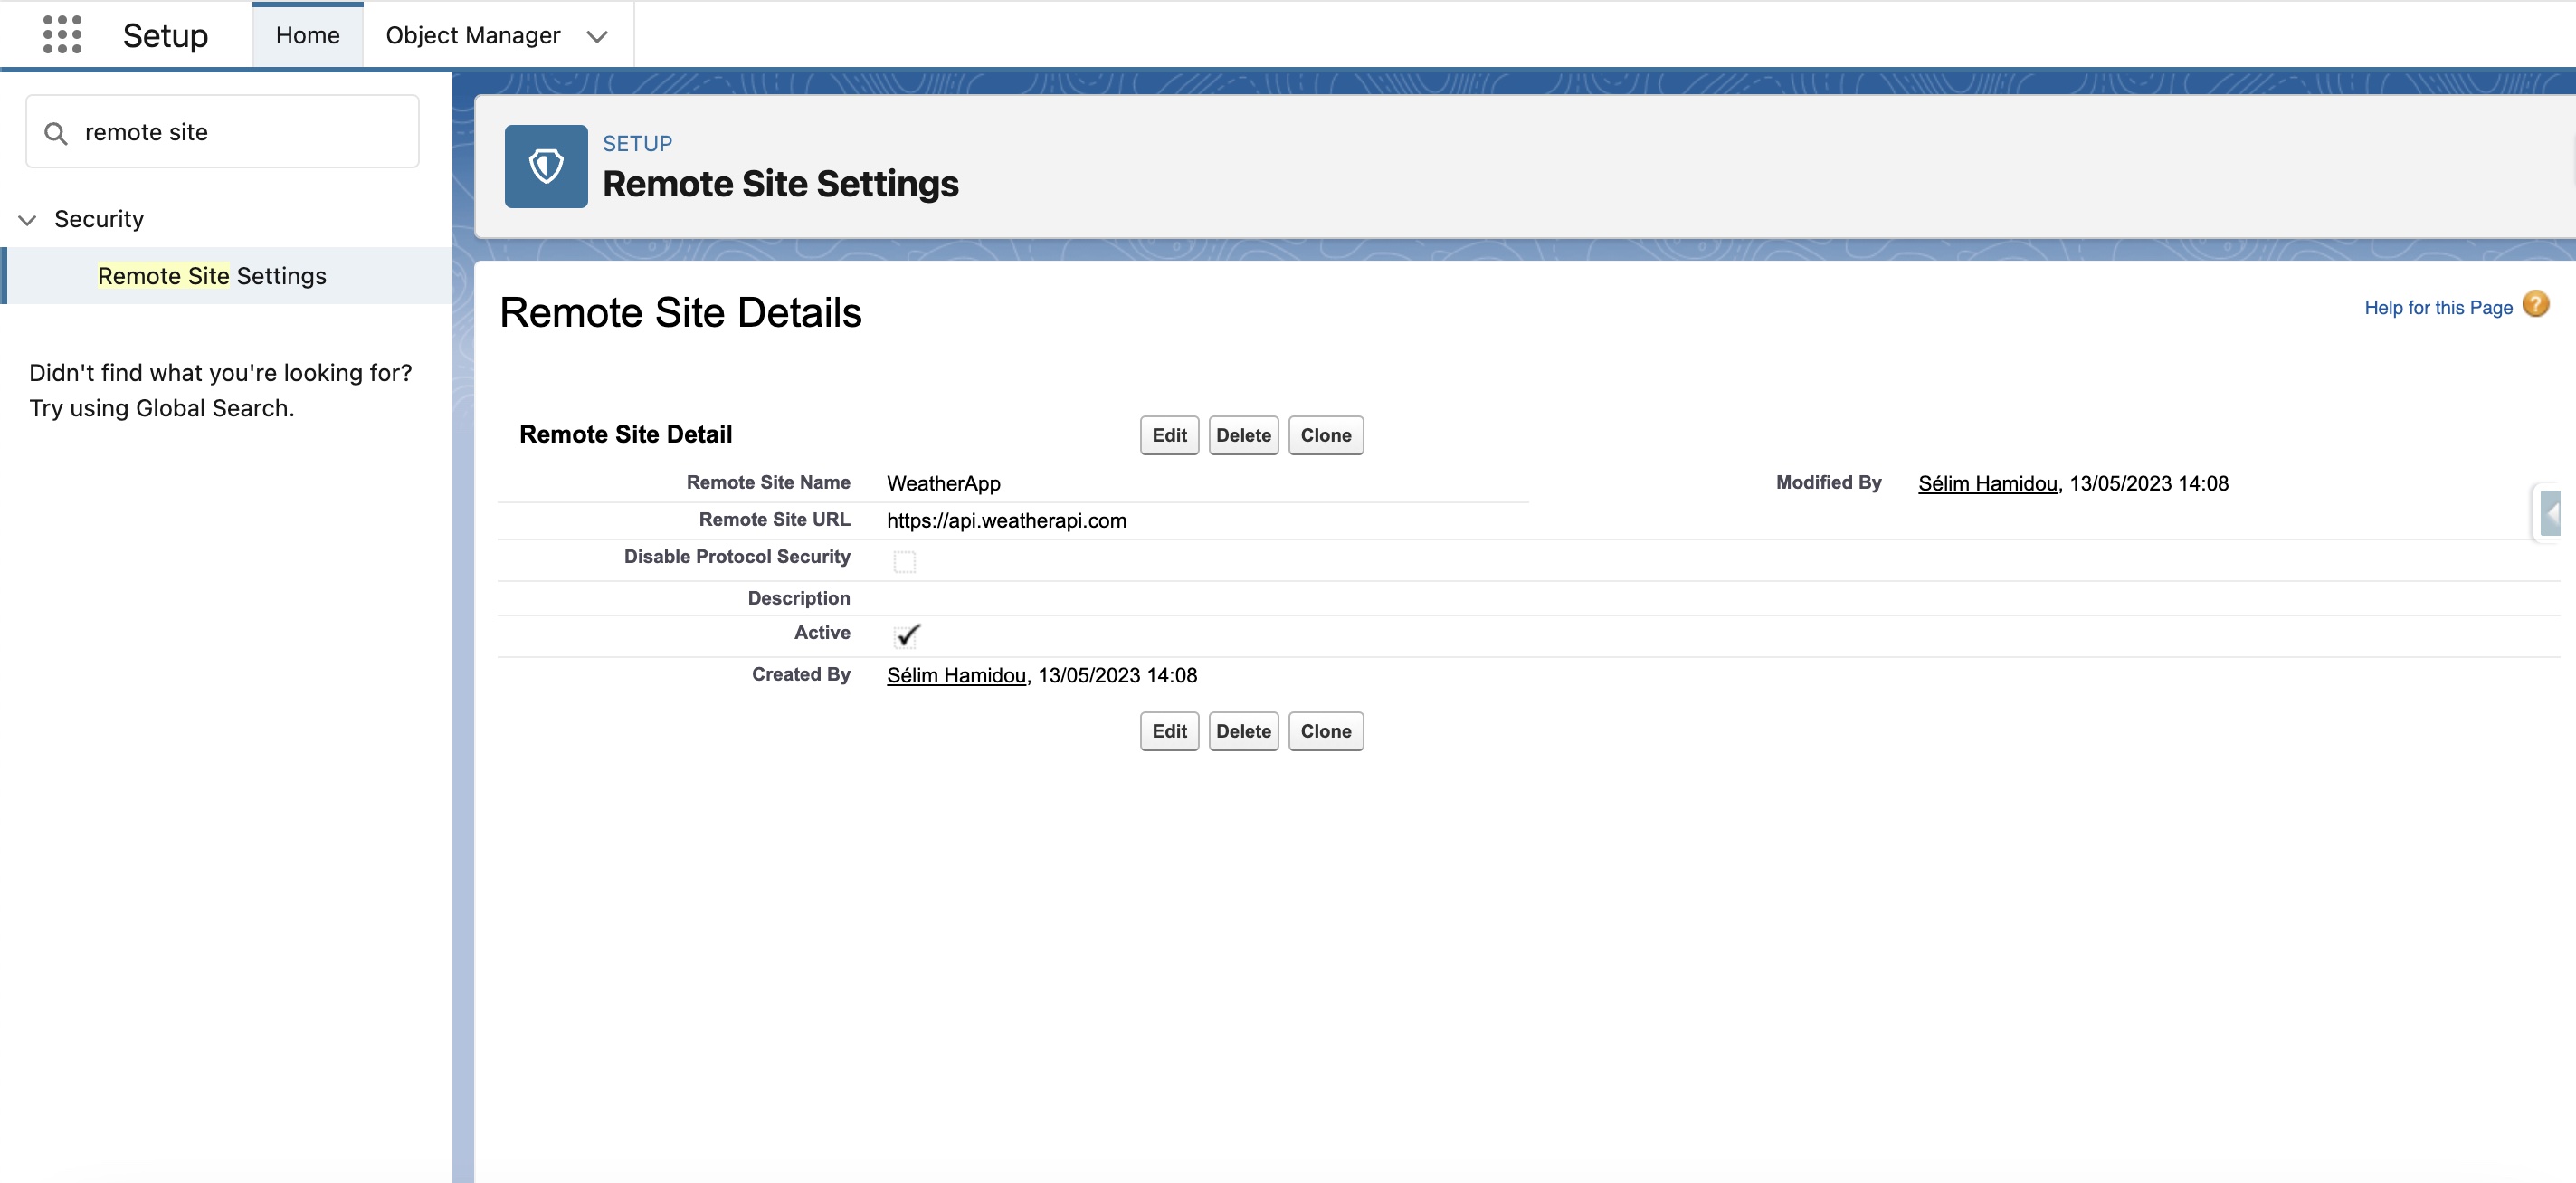
Before we begin, we have to choose an API and authorize an endpoint. We’ve chosen an API called weatherapi and created a remote site setting for the occasion(to tell Salesforce that this connexion is legit).
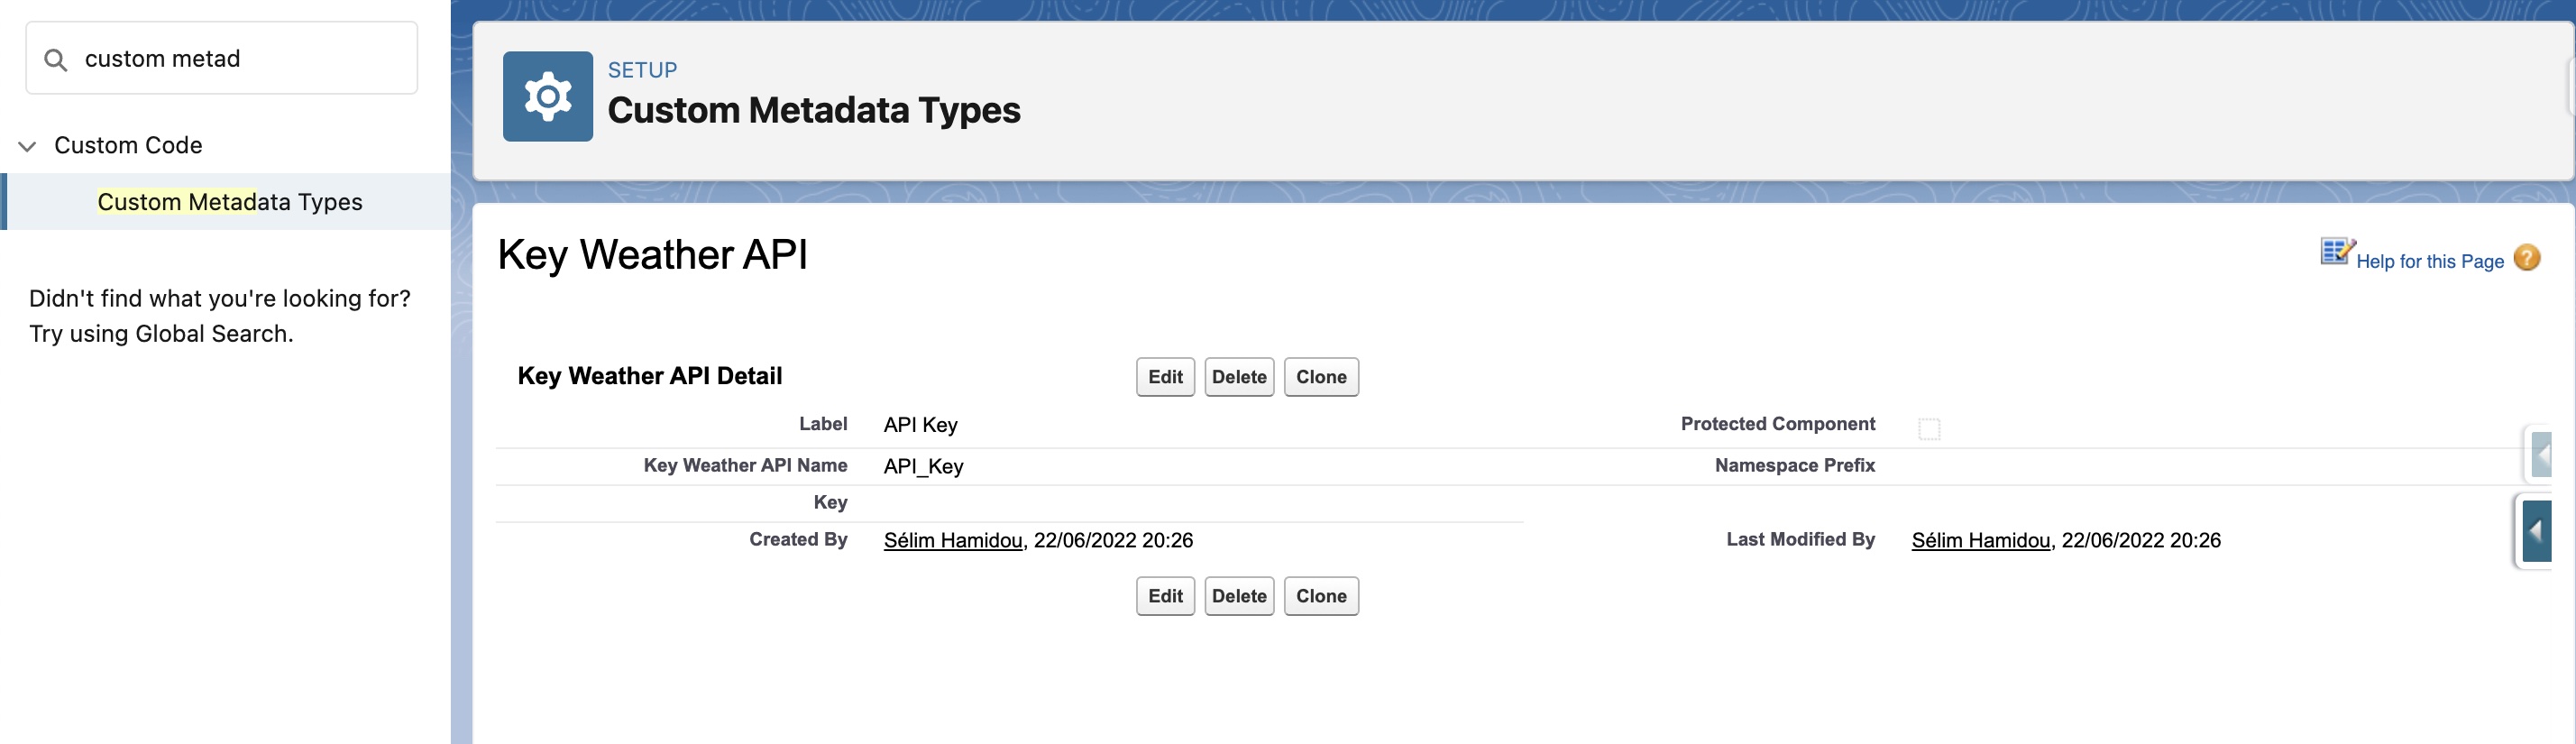
The next thing to do is to create a custom metadata type called Key_Weather_API__mdt. We add a custom field of type text, Key__c. Then, we can create our record on this custom metadata type, which will store our token.
To get a token, we have to go to https://www.weatherapi.com/my/. Normally, you should see a menu asking you to create a new token. When we got the token, you copy it. After that, you can create a new Key_Weather_API__mdt record, and paste the token to it.
Now that everything is in place, we can begin our Lightning Web Component!
Step 1: HTML
Here, the lightning layouts and lightning layout items allow me to get some columns. I need four(Location, Temperature(°C), Weather Conditions, and Weather Icon). I still used slds to improve the render, and I also used two lines of CSS to describe how I want the text to be displayed. It could have been used directly inside the html template, but I find it more convenient to also have an external CSS file when slds is not sufficient. But it’s up to you. Concerning the icons, I called them from Lightning Design System. I will add the links at the end of this article.
<template>
  <lightning-card title="What's the weather like here?">
    <lightning-layout>
      <!-- Location -->
      <lightning-layout-item
        size="1"
        medium-device-size="3"
        padding="around_xx-small"
      >
        <lightning-card
          icon-name="standard:location"
          class="slds-align_absolute-center"
          title="Location"
        >
          <div class="slds-align_absolute-center css-text">{location}</div>
        </lightning-card>
      </lightning-layout-item>
      <!-- Location -->
      <!-- Temperature -->
      <lightning-layout-item
        size="1"
        medium-device-size="3"
        padding="around_xx-small"
      >
        <lightning-card
          icon-name="custom:custom97"
          class="slds-align_absolute-center"
          title="Current Temperature"
        >
          <div class="slds-align_absolute-center css-text">{temperature}</div>
        </lightning-card>
      </lightning-layout-item>
      <!-- Temperature -->
      <!-- Weather Conditions -->
      <lightning-layout-item
        size="1"
        medium-device-size="3"
        padding="around_xx-small"
      >
        <lightning-card
          icon-name="utility:flow"
          class="slds-align_absolute-center"
          title="Current Wind Speed"
        >
          <div class="slds-align_absolute-center css-text">
            {weatherConditions}
          </div>
        </lightning-card>
      </lightning-layout-item>
      <!-- Weather Conditions -->
      <!-- Weather Icon -->
      <lightning-layout-item
        size="1"
        medium-device-size="3"
        padding="around_xx-small"
      >
        <lightning-card
          icon-name="standard:invocable_action"
          class="slds-align_absolute-center slds-m-bottom_none"
          title="Weather Icon"
        >
          <div
            class="slds-align_absolute-center css-text weather-icon"
            style="position: relative; top: -20px; left: 0px"
          >
            <img src={weatherIcon} alt="weather icon" />
          </div>
        </lightning-card>
      </lightning-layout-item>
      <!-- Weather Icon -->
    </lightning-layout>
  </lightning-card>
</template>
.css-text {
color: black;
font-size: 15px;
font-weight: 500;
}Step 2: JavaScript
Two steps here: 1)We get the current location of the user(the user will have to allow the geolocation on his computer if he wants this to work), and store it to two variables(one for longitude, one for latitude), and 2)We call Apex with these two. In return, our Apex method gives us the weather information we want to display on the screen.
import { LightningElement, wire } from "lwc";
import { ShowToastEvent } from "lightning/platformShowToastEvent";
import { getRecord } from "lightning/uiRecordApi";

//We import the getInfosFromApi Apex method
import getInfosFromApi from "@salesforce/apex/methodUtils.getInfosFromApi";

export default class WeatherComponent extends LightningElement {
  error; //We use it to handle errors when we try to get the weather data with the wire service
  //These two variables will store the actual exact position of the user, and will be reinjected on the apex method
  longitude;
  latitude;
  //These are the variables we want to display on the screen
  location;
  temperature;
  weatherConditions;
  weatherIcon;

  //We call the getInfosFromApi method with the latitude and longitude parameters, and if there is no error, we get back the weather data
  @wire(getInfosFromApi, { latitude: "$latitude", longitude: "$longitude" })
  wiredInfos({ error, data }) {
    //The data here is an object. So we just have to save the elements of the object on variables, and then display them to the screen
    if (data) {
      this.location = data.location;
      this.temperature = data.temperature;
      this.weatherConditions = data.weatherConditions;
      this.weatherIcon = data.weatherIcon;
    } else if (error) {
      this.error = error;
    }
  }
  //When the page loads, we call getUserLocation
  renderedCallback() {
    this.getUserLocation();
  }

  //We get the actual geolocation of the current user
  getUserLocation() {
    if (navigator.geolocation) {
      navigator.geolocation.getCurrentPosition((position) => {
        // We get the Latitude and Longitude from Geolocation API, and save them to variables
        this.latitude = position.coords.latitude;
        this.longitude = position.coords.longitude;
      });
    }
  }
}
Step 3: Apex
When we think about calling an external web service, we got to think about two things: how to authorize the endpoint, and where to store the credentials. For this step, we have the choice between using a named credential to handle the whole operation or using a remote site setting with a custom metadata type(to store the credentials). I chose to use the latter because, in my mind, both are secure. The thing to avoid is having some confidential information on the code, which is not the case here.
I also didn’t use it, but you can use Postman when you need to test API callouts before beginning the developments, it’s pretty useful, knowing that each API has its own specificities.
You also have to know here that, even if we return a Map<String, String> from this method, the received data into the LWC will be an object.
public with sharing class methodUtils {
//This method is called with the wire service(cacheable=true).
//When the location(latitude and/or longitude) changes, the method is called
@AuraEnabled(cacheable=true)
public static Map<String, String> getInfosFromApi(
String latitude,
String longitude
) {
//We define a map that will store all the weather information we need(at this time: location, temperature, weather condition, weather icon)
Map<String, String> weatherFactorsMap = new Map<String, String>();
//We define an HTTP request
Http http = new Http();
HttpRequest request = new HttpRequest();
//We call the custom metadata type we created sooner(Key_Weather_API__mdt), to get the actual token, and to connect to the API
String key = String.valueOf(
Key_Weather_API__mdt.getInstance('API_Key').get('Key__c')
);
//Defining the endpoint, with the two parameters of the method(latitude and longitude)
request.setEndpoint(
'https://api.weatherapi.com/v1/current.json?key=' +
key +
'&q=' +
latitude +
',' +
longitude +
'&aqi=no'
);
//We only need to get some data, so the "GET" method is the most adequate one here
request.setMethod('GET');
//We send the request
HttpResponse response = http.send(request);
// If the request is successful, we parse the JSON response
if (response.getStatusCode() == 200) {
// We deserialize the JSON string into maps, to access the fields we want
Map<String, Object> deserializedMap = (Map<String, Object>) JSON.deserializeUntyped(
response.getBody()
);
Map<String, Object> allFields = (Map<String, Object>) deserializedMap.get(
'current'
);
Map<String, Object> conditionFields = (Map<String, Object>) allFields.get(
'condition'
);
Map<String, Object> locationFields = (Map<String, Object>) deserializedMap.get(
'location'
);
String location =
String.valueOf(locationFields.get('name')) +
', ' +
String.valueOf(locationFields.get('country'));
String temperature = String.valueOf(allFields.get('temp_c'));
String weatherConditions = String.valueOf(conditionFields.get('text'));
String weatherIcon = String.valueOf(conditionFields.get('icon'));
//When we get the fields, we save them to the weatherFactorsMap...
weatherFactorsMap.put('location', location);
weatherFactorsMap.put('temperature', temperature);
weatherFactorsMap.put('weatherConditions', weatherConditions);
weatherFactorsMap.put('weatherIcon', weatherIcon);
}
//...And we return them to the LWC
return weatherFactorsMap;
}
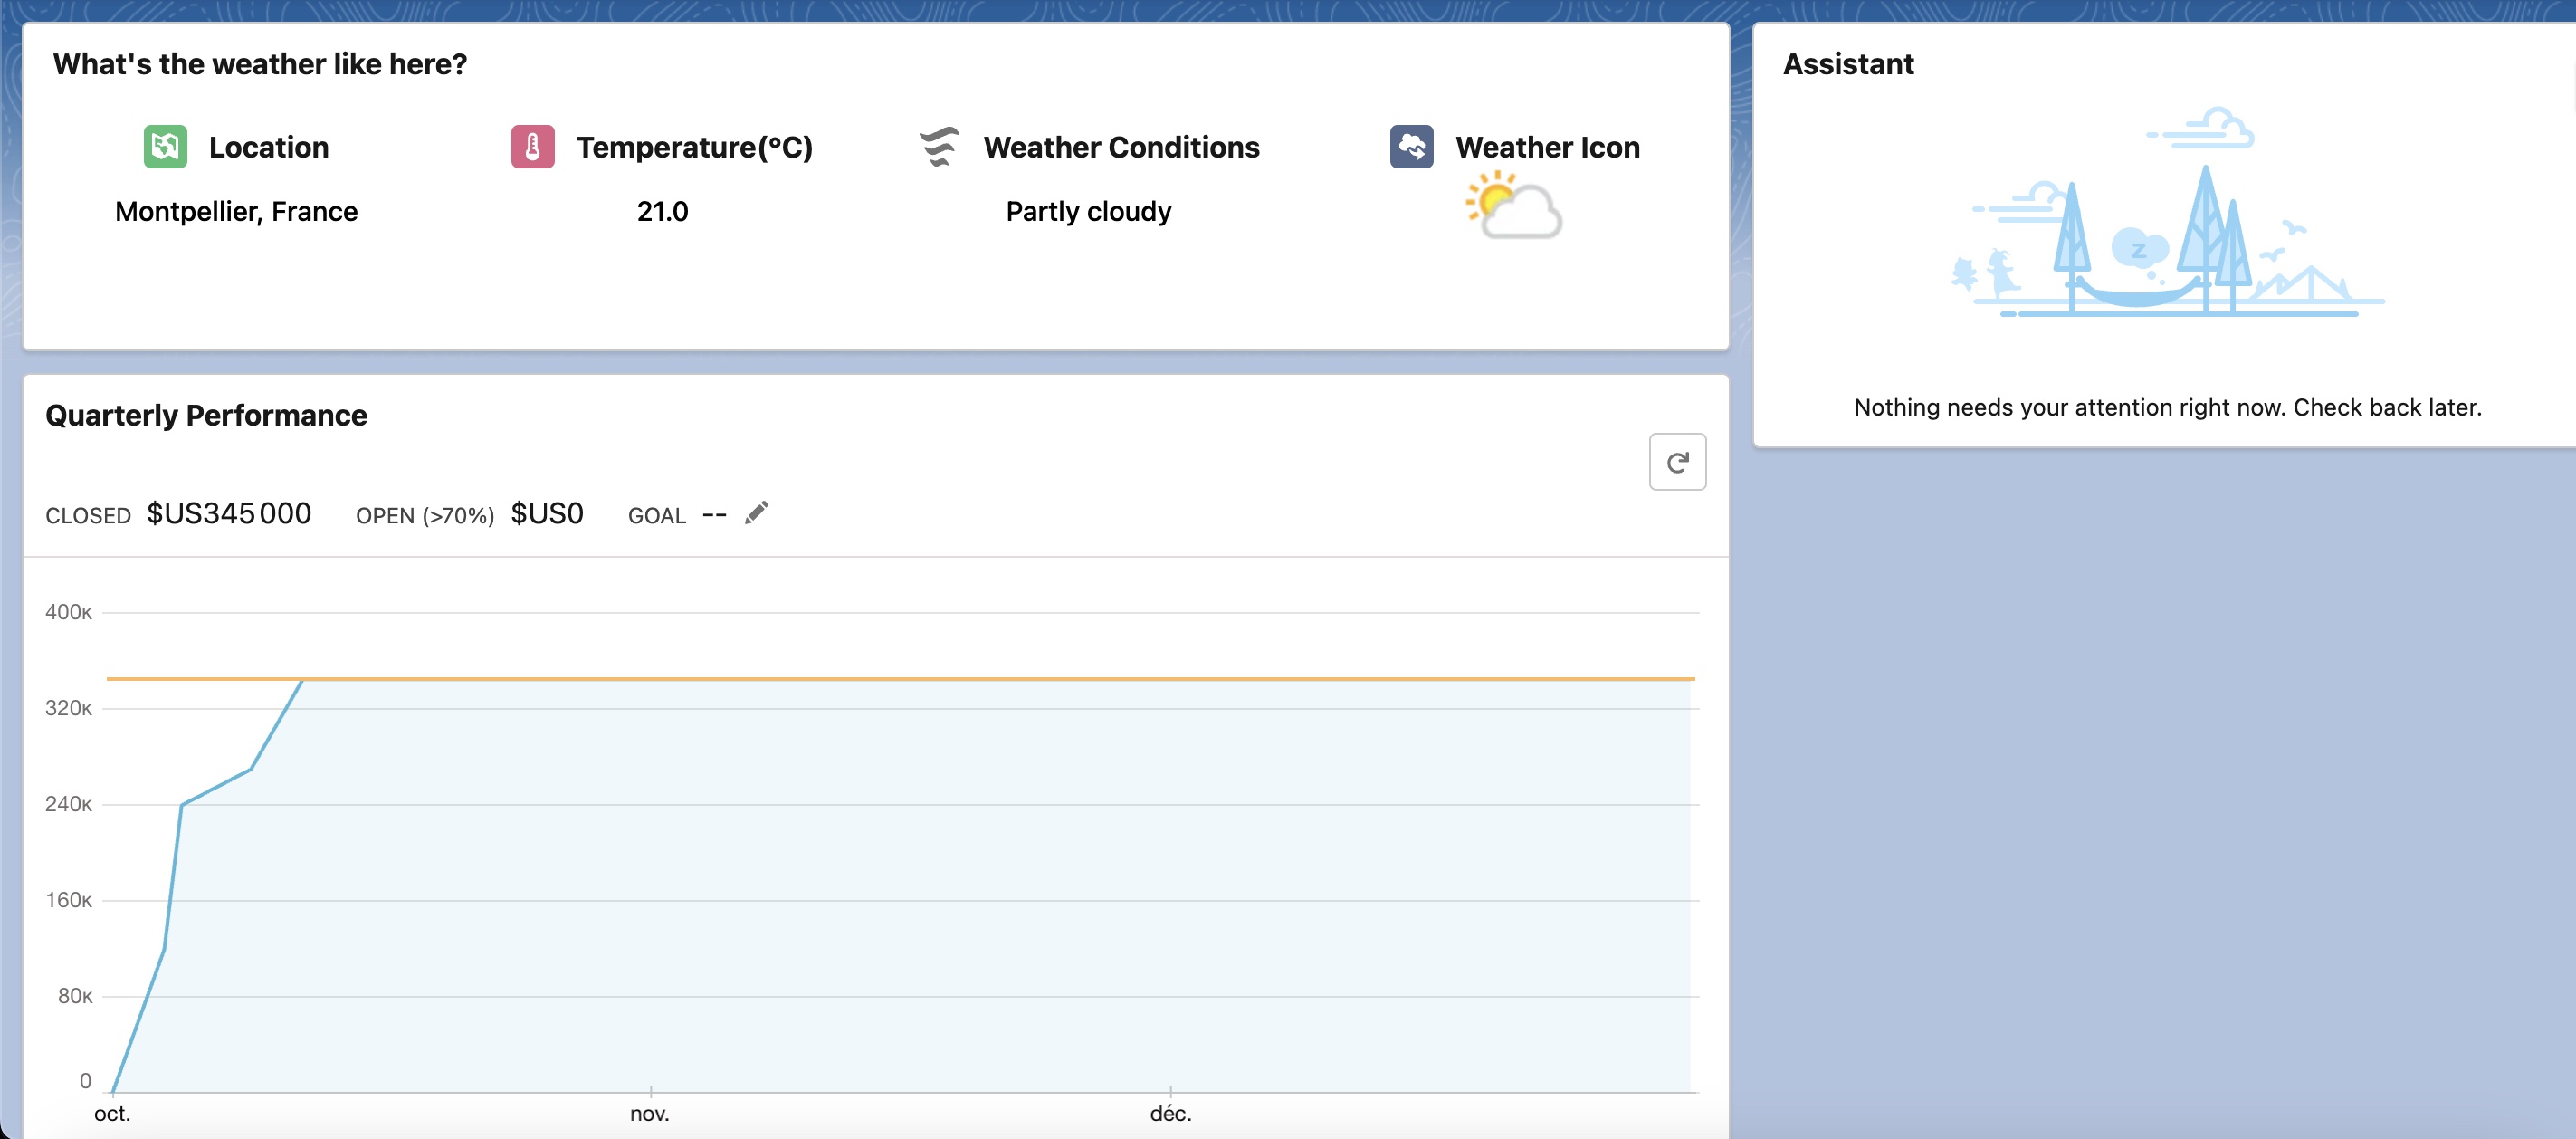
}Step 4: Result
We can also add the meta file to our component:
<?xml version="1.0" encoding="UTF-8"?>
<LightningComponentBundle xmlns="http://soap.sforce.com/2006/04/metadata">
    <apiVersion>54.0</apiVersion>
    <isExposed>true</isExposed>
    <targets>
        <target>lightning__AppPage</target>
        <target>lightning__RecordPage</target>
        <target>lightning__HomePage</target>
    </targets>
</LightningComponentBundle>
And now, here is the result:
You can check these links, they are very useful:
Sélim HAMIDOU