I developed a solution with Salesforce to receive SMS alerts before a meeting
Hey! I am convinced that it's really important to prepare well for the meetings we get, but it's so easy to forget them. So, to avoid this situation, I've created a new solution. When you are on the Calendar object on Salesforce, and you want to add an Event, you can specify a time before a meeting, and you will receive a SMS alert at this time. With this, you are sure to be the best prepared for your meeting!
Step one: Configuration
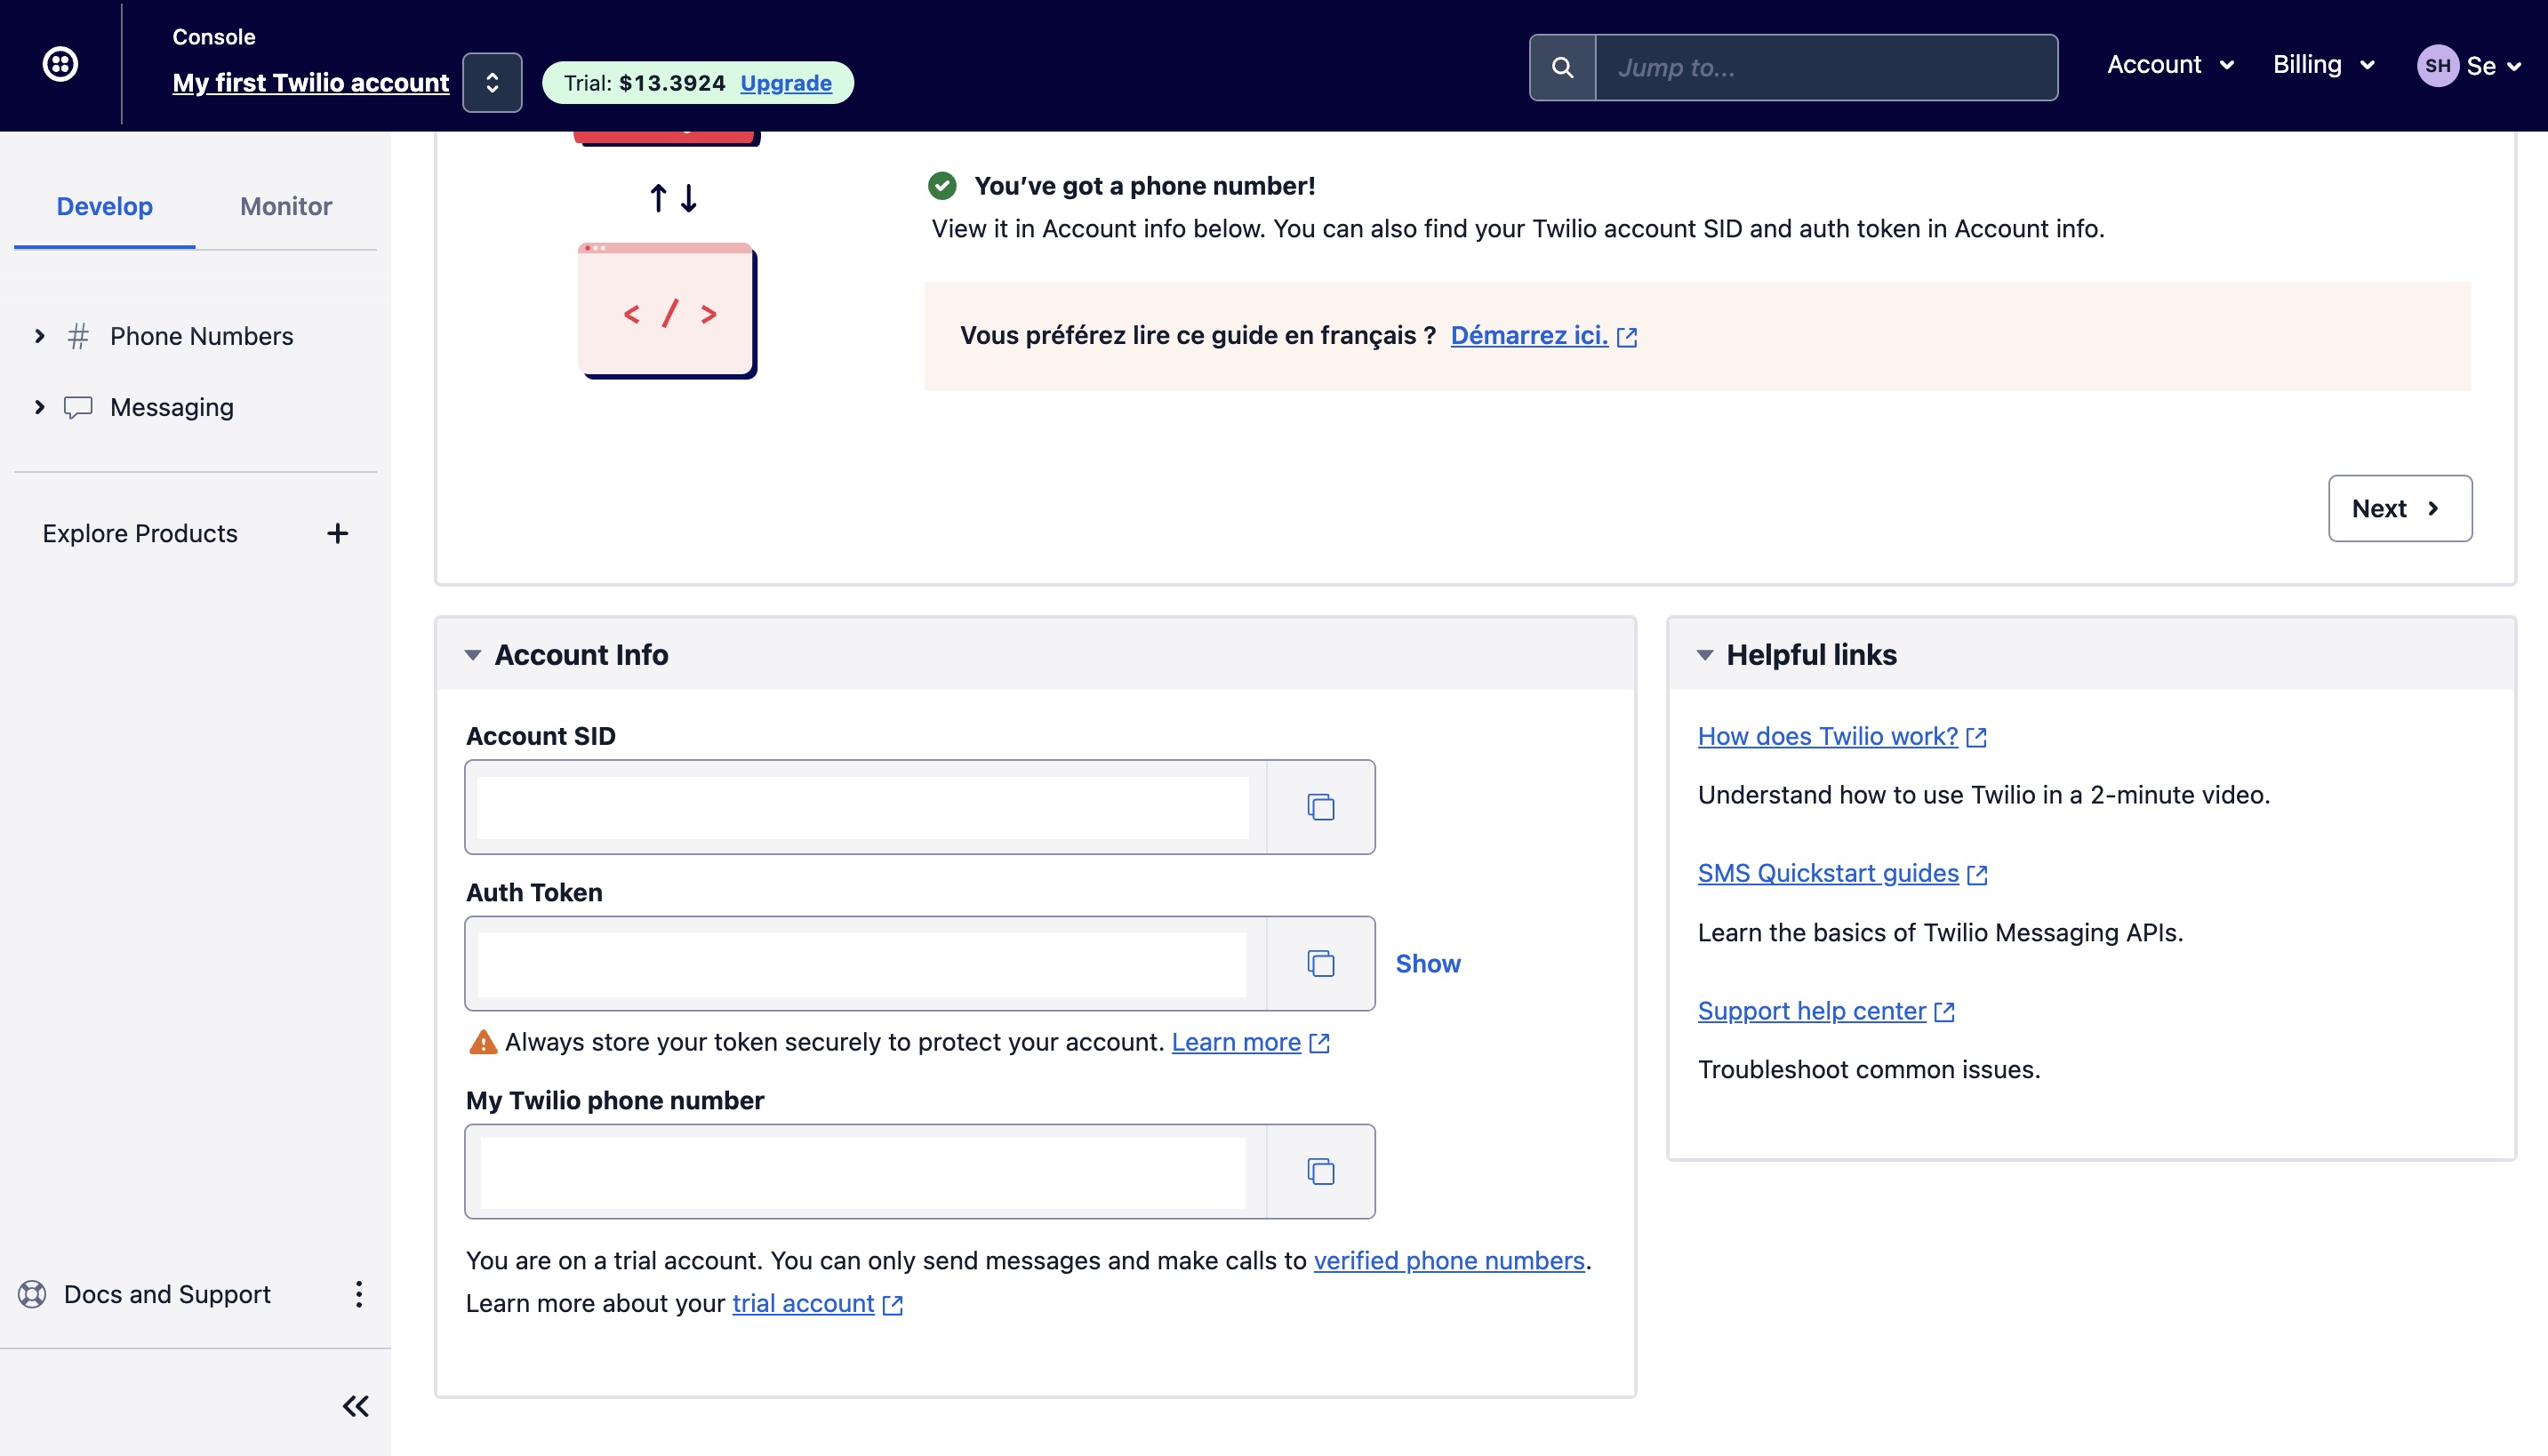
To develop this solution, we will need to integrate Salesforce with Twilio API. Don't worry, I will explain everything! The first thing to do is to sign up for the Twilio API. Then you have to go to the Twilio console, and to get your credentials. You will need three things: an API token, an Account SID, and a sender phone number. These three pieces of information will allow you to connect to the Twilio API, and to send some messages. Even if sending an SMS with this API has a cost, you can benefit from a 15 dollars credit with the trial version. And you don't need to enter your credit card information, so that's pretty cool, and to be honest, the 15 dollars will be really enough to test our development.
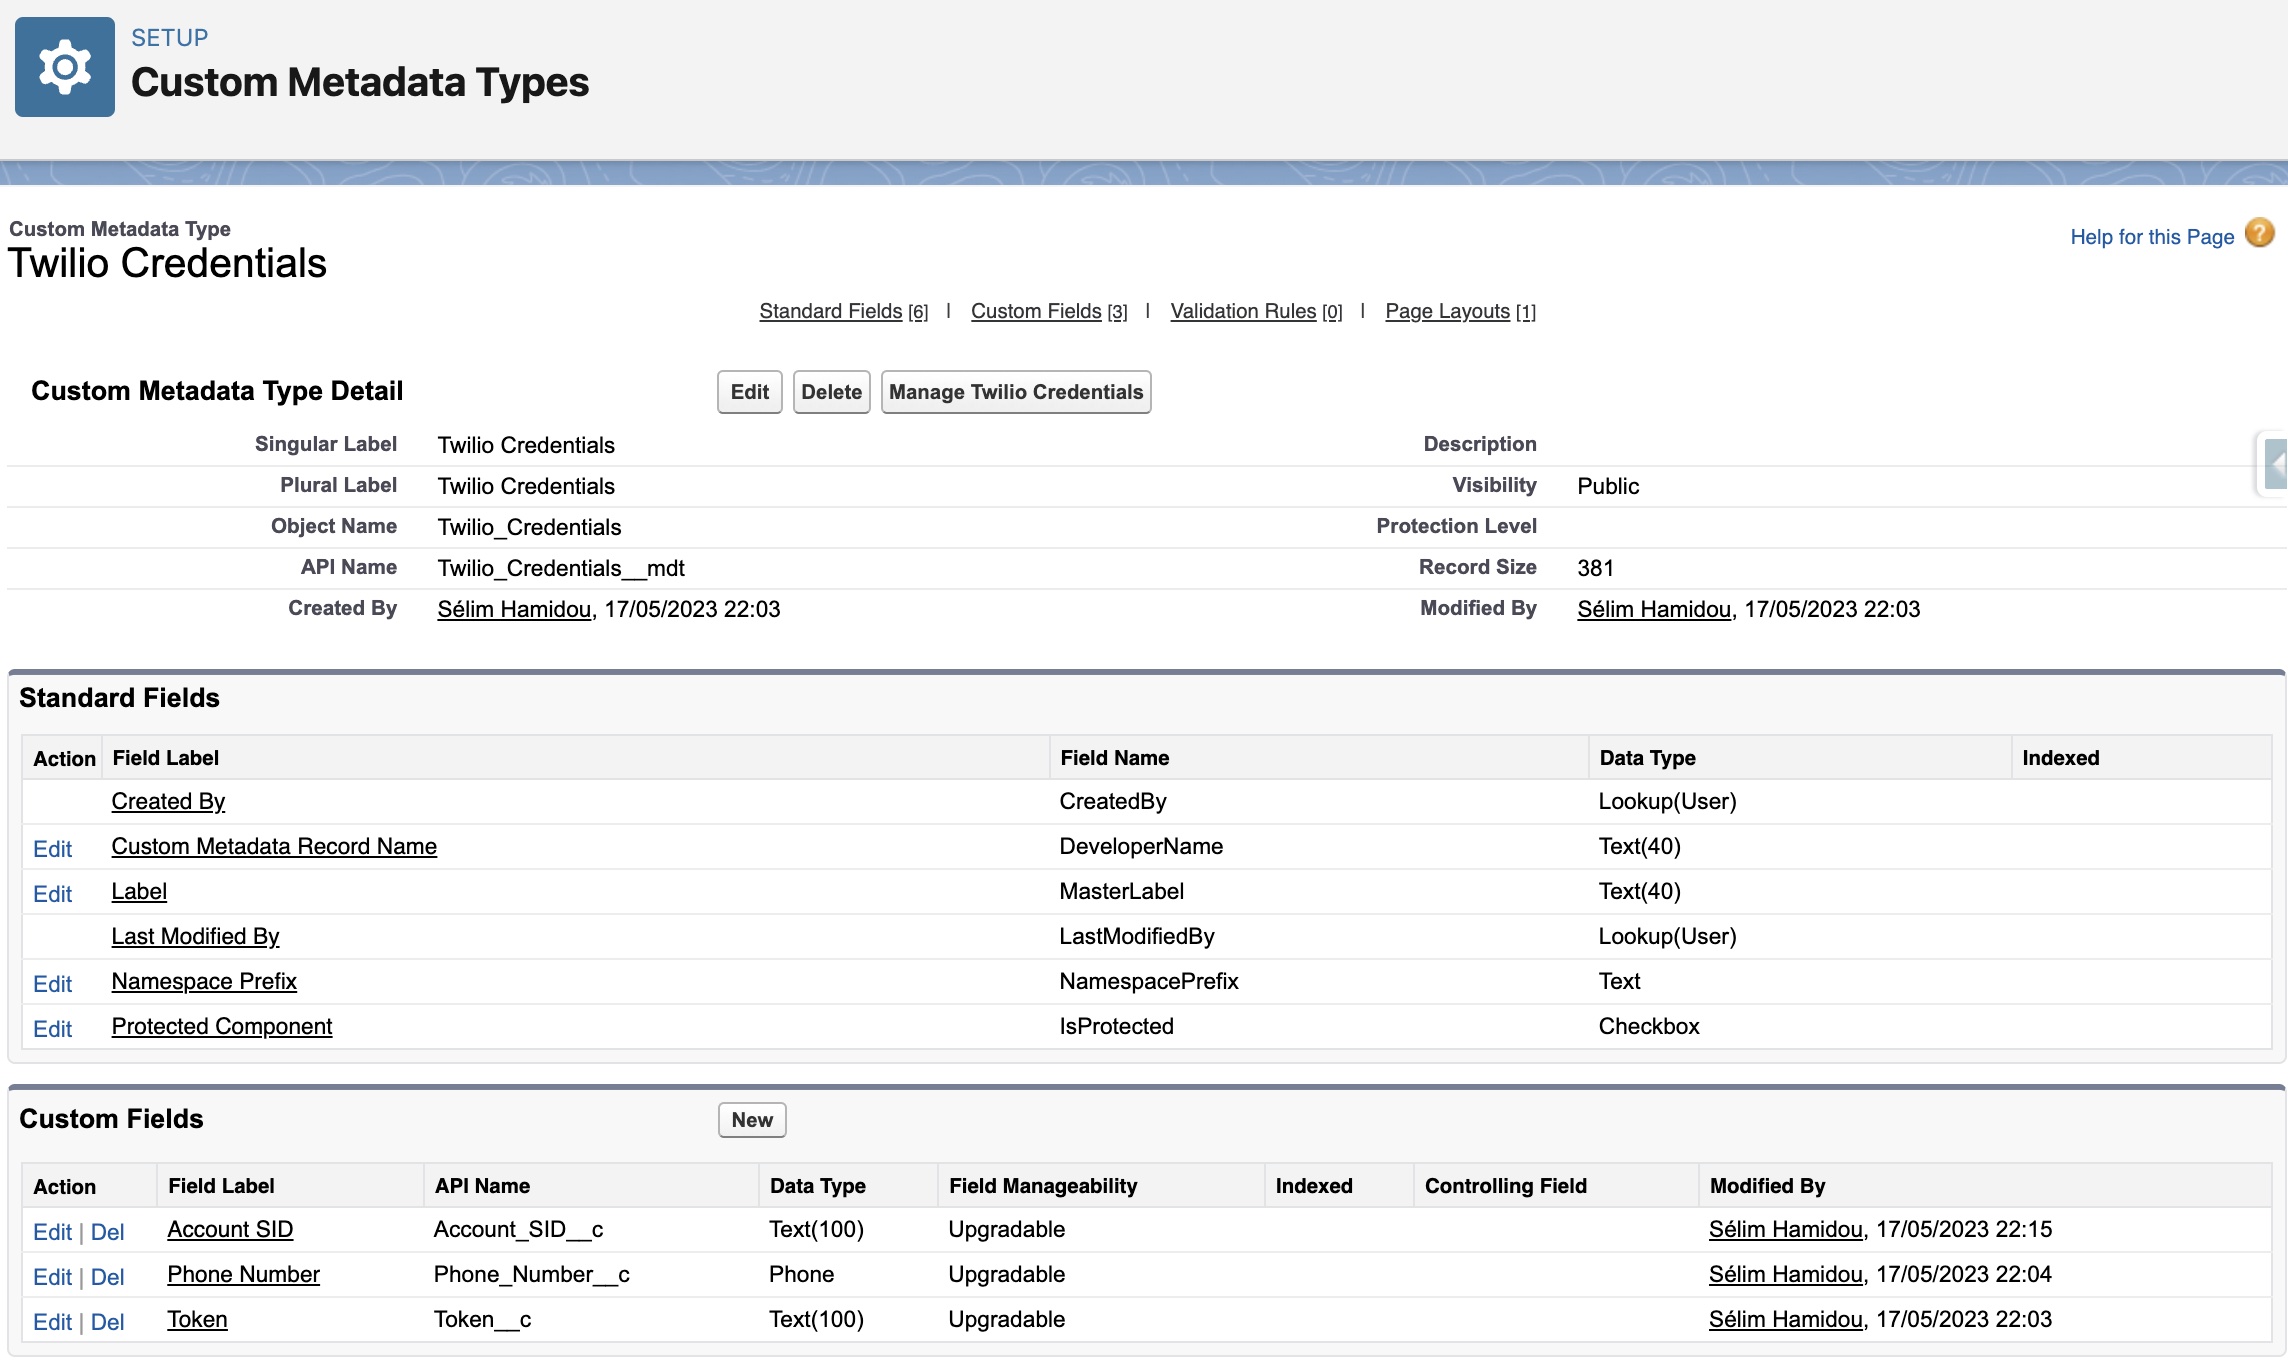
Now that we have this information, we can create a custom metadata type, called Twilio_Credentials__mdt. On this custom metadata type, we create three fields: Account_SID__c, Phone_Number__c, and Token__c. The phone number will be the number from which Twilio will send the SMS.
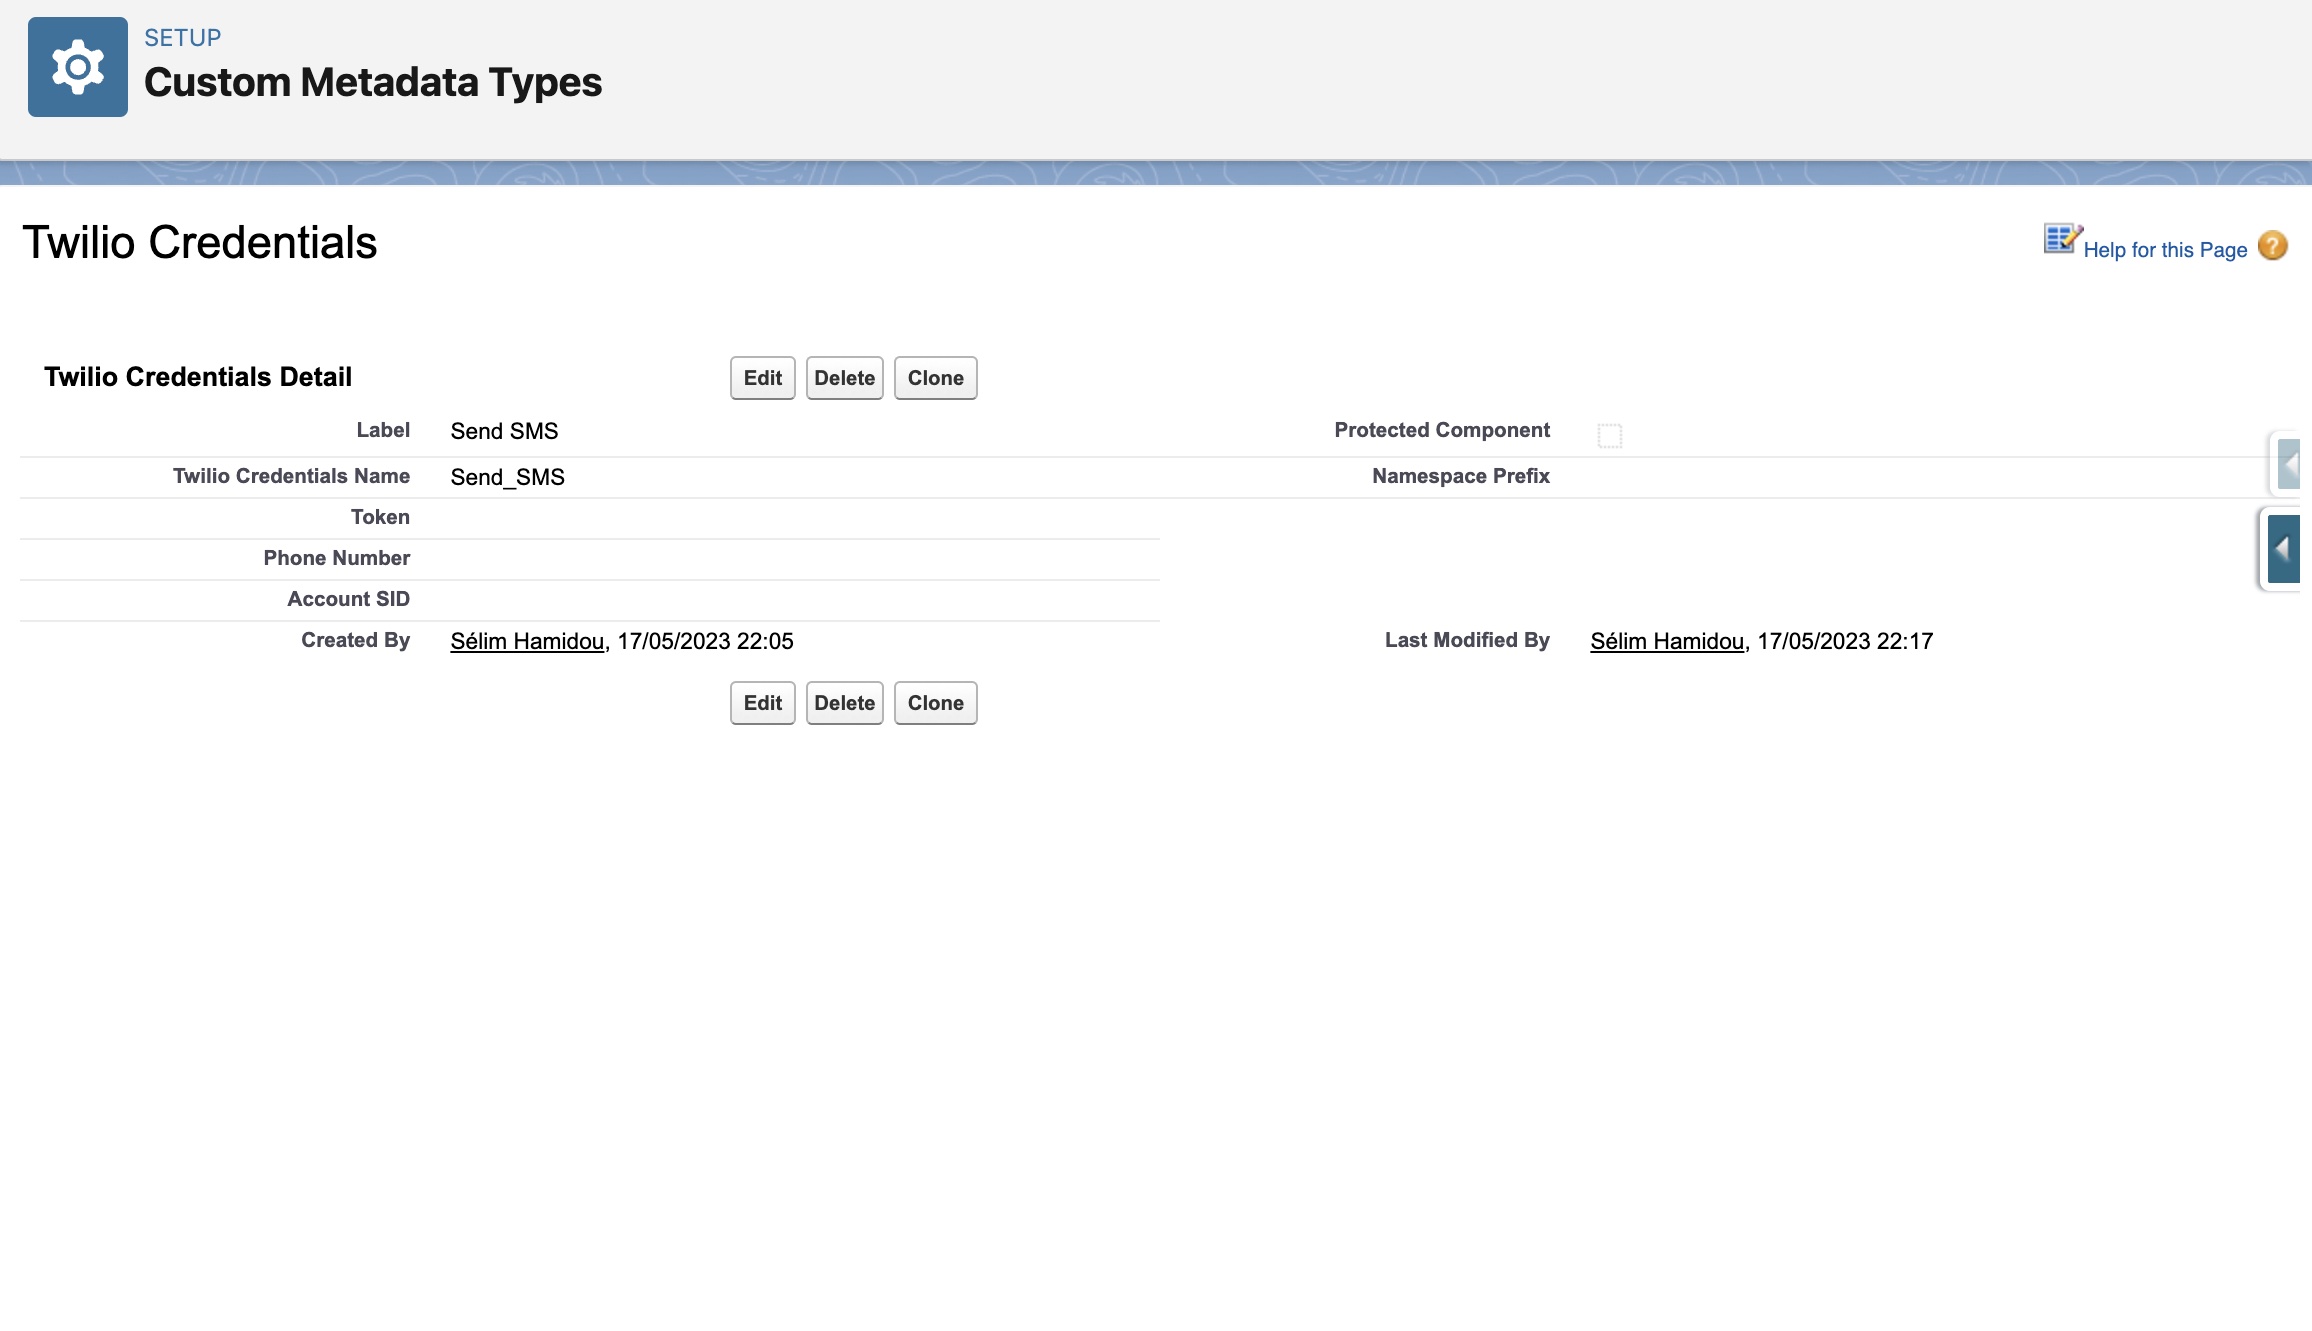
When it's done, we can add a new custom metadata type record, Send_SMS, and add the given information in it.
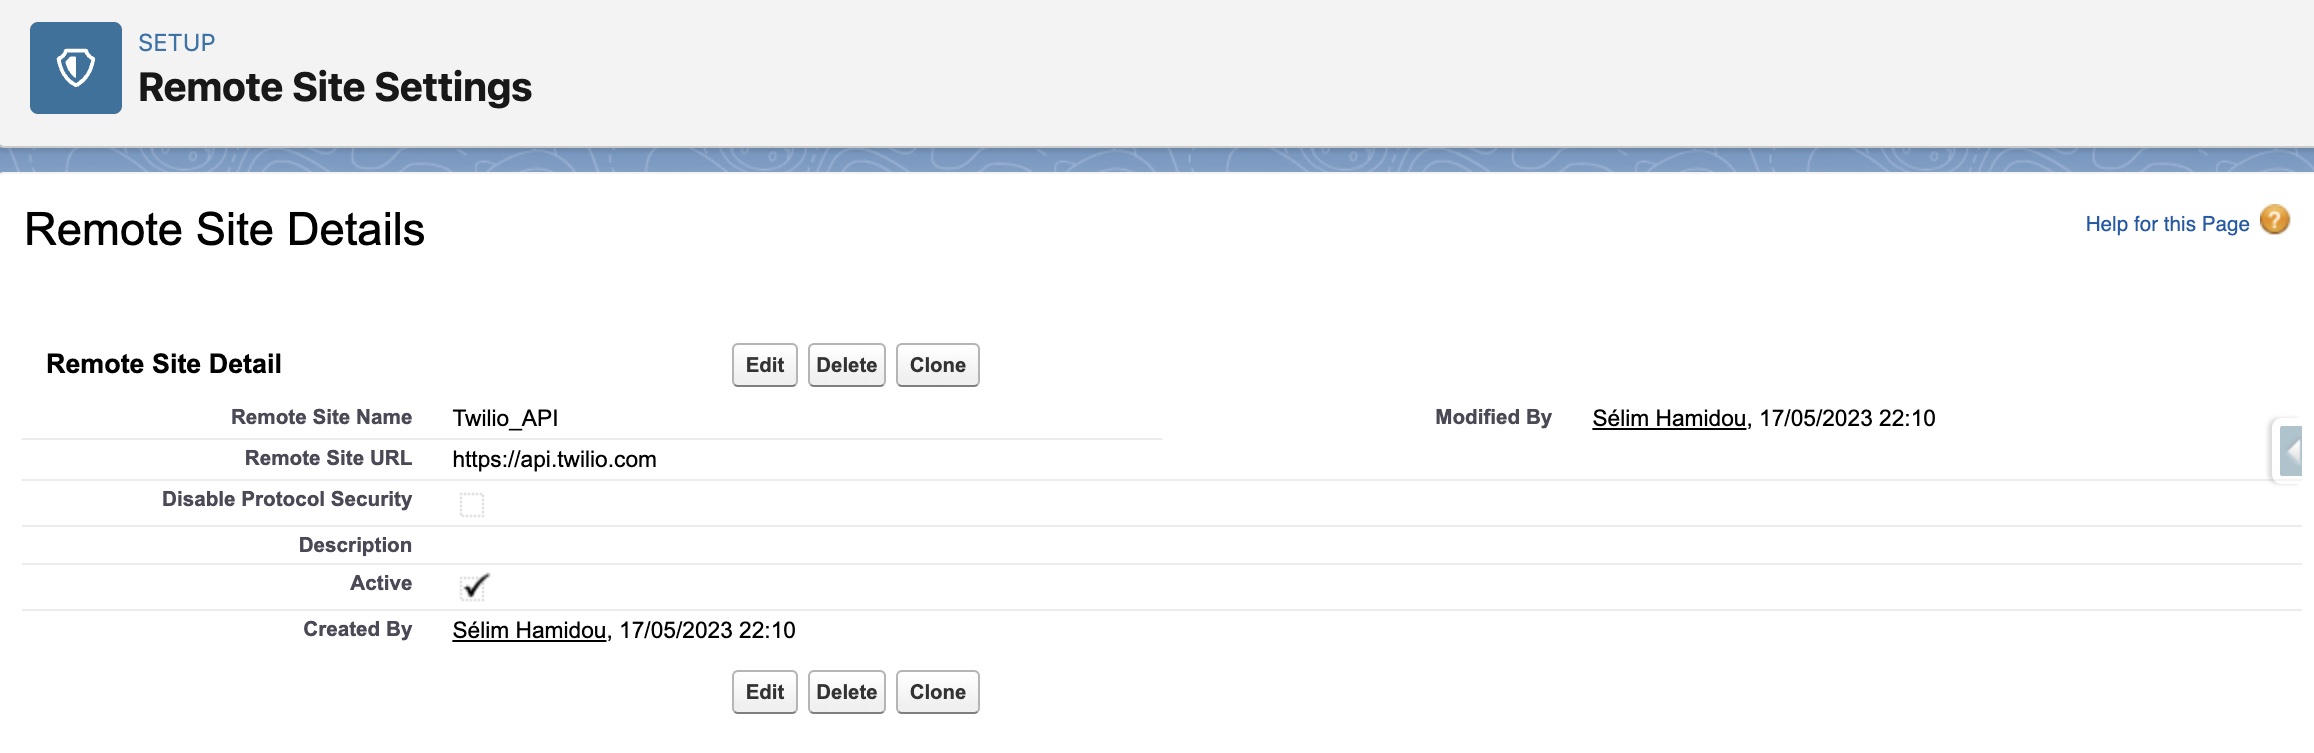
Then, we have to authorize the connexion to Twilio. For this, we use a remote site setting.
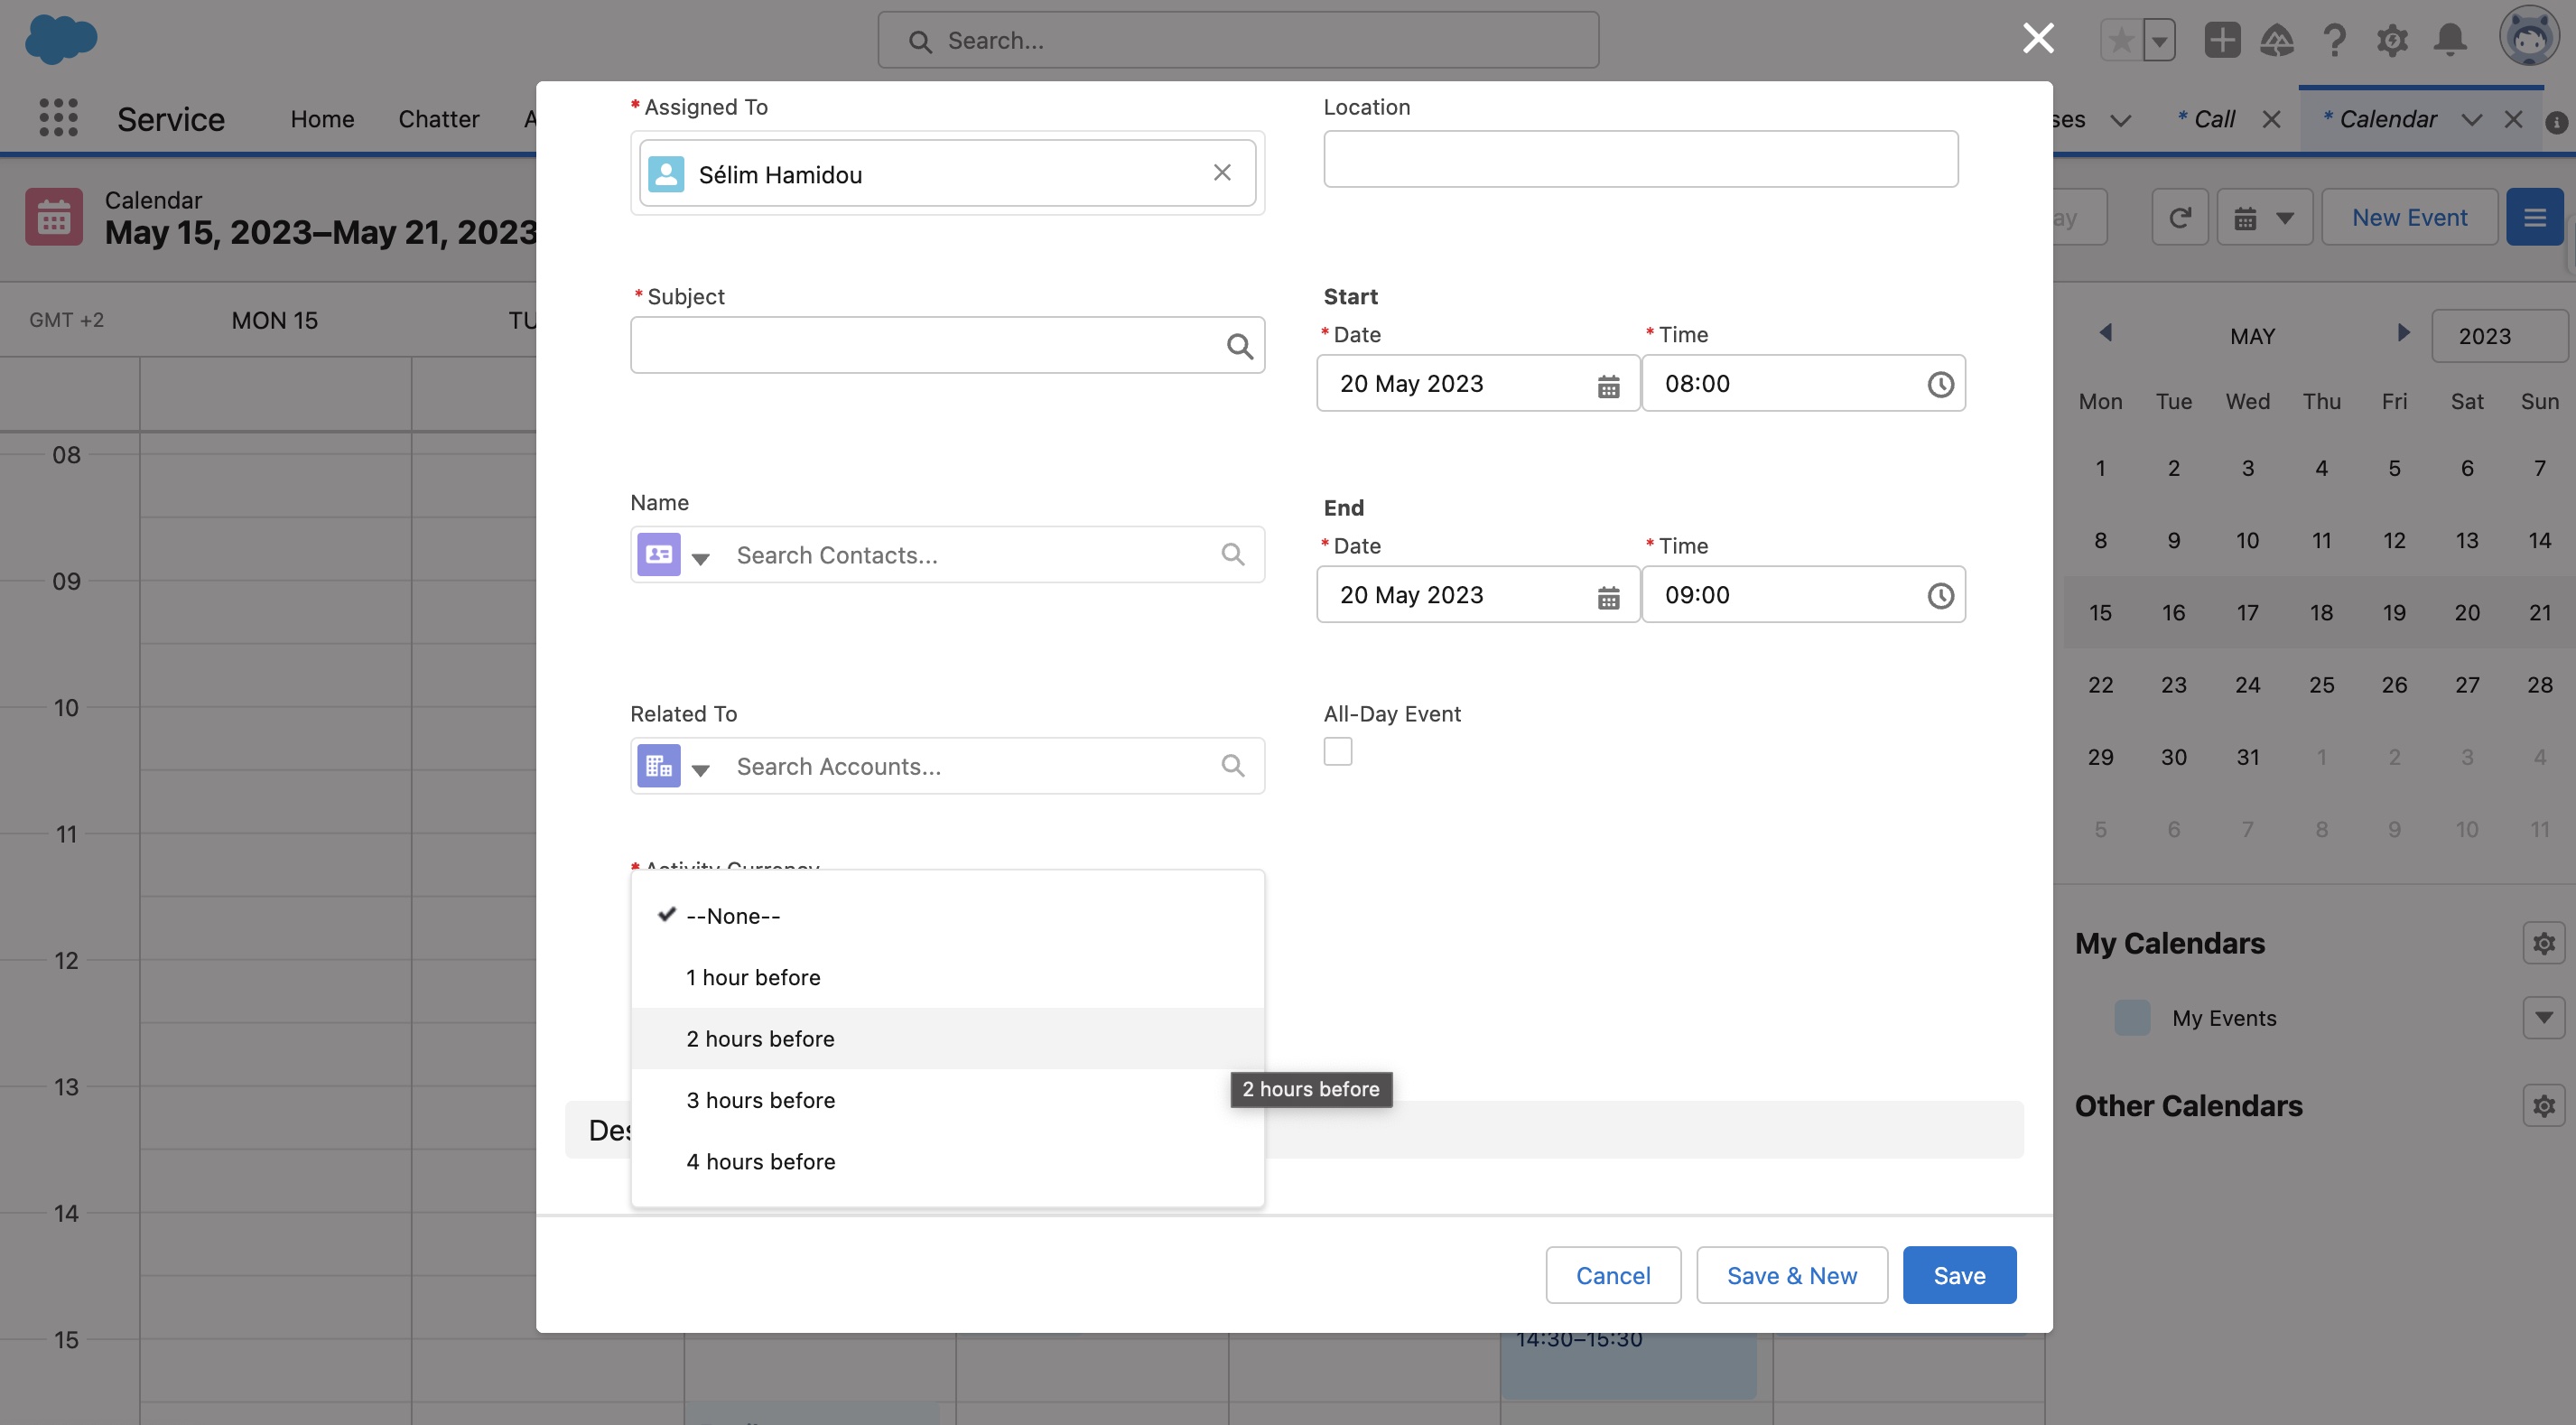
Now that the connexion is authorized, we can move to the purely functional part. What do we want? We want a picklist with some values of when to send the sms. So we create it, with these values.

Now, when we want to create an event on the calendar, we got this:
Step 2: The Apex part
Now that the UI is set, what do we want? We want that, when we create an event, we send an SMS. So, using a trigger is the thing to do. A flow could be used too, but in every case, we will have to use some Apex code(it's especially true when we have to call an API), so we prefer to do everything in Apex instead of using a flow which will call some Apex code, but it's up to you to choose between both. We also have to be aware of the fact that here, handling the events inserts is not sufficient. What do we do when we change the date of an event. Does the SMS have to be sent at the previous time? And when do we delete the event? For this, we check the context(before, after, update, insert, delete) on the trigger, and then we call the trigger handler. Using a trigger handler is really good to keep our code clean.
//I know, we have to be careful with "after triggers", to avoid recursion.
//Here, I used an after insert to be able to get the actual event Id and to reinject it in the scheduled job's name.
//By doing this way, I get unique job names
//The trigger works on insert(ie we create a new event), on update(ie we change the date and/or the time of the sms alert), and on delete(ie we delete the event, so we also have to delete the job. Anyway, it will still run, and we don't want this)
trigger onEventTrigger on Event(after insert, before update, before delete) {
  //We check the context: first to control exactly when the code triggers, and also to avoid recursion
  if (Trigger.isInsert && Trigger.isAfter) {
    eventTriggerHandler.onAfterInsert(Trigger.new);
  }
  //Now that the first import has already been done, it's simpler. The context here just needs a classic before update
  if (Trigger.isUpdate && Trigger.isBefore) {
    eventTriggerHandler.onBeforeUpdate(Trigger.New, Trigger.oldMap);
  }
  //When the user deletes an event, we have to avoid the job being processed. So, we remove it.
  if (Trigger.isDelete) {
    eventTriggerHandler.onBeforeDelete(Trigger.New);
  }
}
The trigger handler
As you guessed, all the methods you've seen called on the trigger are defined right here, on the handler. For this handler, the biggest challenge was to remove the existing jobs when it was needed. I am sure you noticed that I didn't add some State filters on the SOQL I made for the cronTriggers. It's because if I did, I would have a bug every time I would try to change the date of an event, when the SMS has already been sent(the State of the job is "deleted", but it's still on the database, so the new job can't have the same name). This part has still to be improved.
public with sharing class eventTriggerHandler {
  //This method will be called when it's needed(ie on Update and Delete contexts)
  public static Map<String, CronTrigger> getAllJobs() {
    List<CronTrigger> cronTriggers = [
      SELECT CronJobDetail.Name, State
      FROM CronTrigger WHERE CronJobDetail.Name LIKE '00U%'
    ];
    //Here we connect every event Id to the associated job. In this way, it's easier to retrieve them
    Map<String, CronTrigger> eventIdCronTriggerMap = new Map<String, CronTrigger>();
    for (CronTrigger eachCronTrigger : cronTriggers) {
      eventIdCronTriggerMap.put(
        eachCronTrigger.CronJobDetail.Name,
        eachCronTrigger
      );
    }
    return eventIdCronTriggerMap;
  }
  public static void onAfterInsert(List<Event> triggeredEvents) {
    //Even if the calendar is generally handled manually, some events could be sent by imports.
    //So it's still important to bulkify our code
    for (Event e : triggeredEvents) {
      scheduleJob(e);   //This method is reusable because the algorithm is the same on insert and update contexts
    }
  }
  public static void onBeforeUpdate(
    List<Event> triggeredEvents,
    Map<Id, Event> oldTriggeredEventsMap
  ) {
    Map<String, CronTrigger> eventIdCronTriggerMap = eventTriggerHandler.getAllJobs();
    for (Event e : triggeredEvents) {
      //We check if the user has changed the start date and/or the Send_a_SMS__c field
      if (
        (oldTriggeredEventsMap.get(e.Id).Send_a_SMS__c != e.Send_a_SMS__c) ||
        (oldTriggeredEventsMap.get(e.Id).StartDateTime != e.StartDateTime)
      ) {
        //We can't update a scheduled job, we can just delete it. So we check on the previous map if the job exists.
        //If yes, we have its Id, so we can remove the job
        if (eventIdCronTriggerMap.get(e.Id) != null) {
          System.abortJob(eventIdCronTriggerMap.get(e.Id).Id);
        }
        //Now we can create a new job, by calling the schedule job with the actual event as an entry
        scheduleJob(e);
      }
    }
  }

  //This method gets the number of hours on the Send_a_SMS__c field
  //For example, if the value of the field is "1 hour before", the method will return 1
  public static Integer extractNumberHours(String inputString) {
    Pattern regex = Pattern.compile('\\d+'); //We define our regex, which has to match one or more digits in a string
    Matcher matcher = regex.matcher(inputString); //We apply the regex to our string

    if (matcher.find()) {
      //If the match succeeds...
      String numberString = matcher.group(); //We get the found value
      return Integer.valueOf(numberString); //We convert it to an integer, and we return it to the schedule job method
    }
    return null; // We have found no number in the string
  }
  public static void scheduleJob(Event e) {
    //if e.Send_a_SMS__c is null, which means that the user doesn't need to receive sms.
    //At first, I wanted to use a checkbox(send vs don't send), AND a picklist(if "send", when to send the sms).
    //But to simplify the UI, I decided to only use a picklist
    if (e.Send_a_SMS__c != null) {
      //We extract the number of hours before the event to send the sms
      //Then, we determine the actual datetime of when to send it
      Integer hoursBeforeMeeting = extractNumberHours(e.Send_a_SMS__c);
      Datetime SMSDateTime = e.StartDateTime.addHours(-hoursBeforeMeeting);
      //The scheduled job can't be in the past, so we add this condition to avoid some errors about the jobs
      if (SMSDateTime > Datetime.now()) {
        //These variables are saved to be dynamically reused on the string.format() method
        String minutes = String.valueOf(SMSDateTime.minute());
        String hour = String.valueOf(SMSDateTime.hour());
        String dayOfMonth = String.valueOf(SMSDateTime.day());
        String month = String.valueOf(SMSDateTime.month());
        String year = String.valueOf(SMSDateTime.year());
        String sch = string.format(
          '0 {0} {1} {2} {3} ? {4}',
          new List<string>{ minutes, hour, dayOfMonth, month, year }
        );
        //We schedule a new job, with the event Id as a Name
        twilioHandler m = new twilioHandler();
        String jobID = System.schedule(e.Id, sch, m);
      }
    }
  }
  public static void onBeforeDelete(List<Event> triggeredEvents) {
    Map<String, CronTrigger> eventIdCronTriggerMap = eventTriggerHandler.getAllJobs();
    for (Event e : triggeredEvents) {
      System.abortJob(eventIdCronTriggerMap.get(e.Id).Id);
    }
  }
}
The REST callout
So, here we schedule a callout. For this, we need both the Schedulable interface, and a future method(callouts cannot be made from a Schedulable alone). By knowing this, we associate the current user phone, the credentials, and the Twilio phone, to make our callout. When it's done, we log a debug('success' or 'failure').
global with sharing class twilioHandler implements Schedulable {
//Because we call an external service, we need to use a future(with the callout=true annotation), or a queueable
@future(callout=true)
global static void callAPI() {
//Here the current user(ie the user doing an operation on the event) will receive the message.
//But you can change it as you like.
//We use the UserInfo.getUserId() to get its id, and we get its phone number with a SOQL query
User currentUser = [
SELECT Phone, Id
FROM User
WHERE Id = :UserInfo.getUserId()
];
//We define an http request
Http http = new Http();
HttpRequest request = new HttpRequest();
//We call the custom metadata type we created sooner(Twilio_Credentials__mdt), to get the actual token, the AccountSID
//and the sender's phone number.
//These values were given by the Twilio API, we use them in order to connect to the API
String key = String.valueOf(
Twilio_Credentials__mdt.getInstance('Send_SMS').get('Token__c')
);
String AccountSID = String.valueOf(
Twilio_Credentials__mdt.getInstance('Send_SMS').get('Account_SID__c')
);
String phone = String.valueOf(
Twilio_Credentials__mdt.getInstance('Send_SMS').get('Phone_Number__c')
);
//We define the header
Blob credentials = Blob.valueOf(accountSID + ':' + key);
String VERSION = '3.2.0';
request.setHeader('X-Twilio-Client', 'salesforce-' + VERSION);
request.setHeader('User-Agent', 'twilio-salesforce/' + VERSION);
request.setHeader('Accept', 'application/json');
request.setHeader('Accept-Charset', 'utf-8');
request.setHeader(
'Authorization',
'Basic ' + EncodingUtil.base64Encode(credentials)
);
request.setHeader('Content-Type', 'application/x-www-form-urlencoded');
//We define the endpoint
request.setEndpoint(
'https://api.twilio.com/2010-04-01/Accounts/' +
AccountSID +
'/Messages.json'
);
//We define the body
request.setBody(
'To=' +
EncodingUtil.urlEncode(String.valueOf(currentUser.Phone), 'UTF-8') +
'&From=' +
EncodingUtil.urlEncode(phone, 'UTF-8') +
'&Body=' +
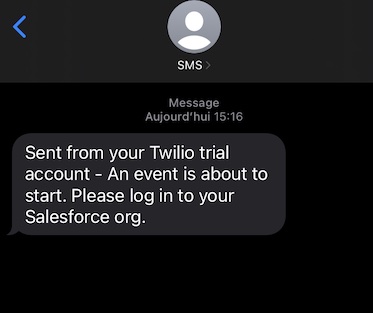
'An event is about to start. Please log in to your Salesforce org.'
);
//We need to post these data to the Twilio API, which will send the SMS to the user's phone, so the POST method is the one to use here
request.setMethod('POST');
//We send the request
HttpResponse response = http.send(request);
// If the request is successful, we parse the JSON response
if (response.getStatusCode() == 201) {
system.debug('success');
} else {
system.debug('failure');
}
}
//We use the execute method of the Schedulable interface to call the Twilio API
global void execute(SchedulableContext SC) {
callAPI();
}
}Conclusion
Now that everything is in place, we can receive an SMS every time we add an event to the calendar, which is great! At this time, the message is not personalized, but it could be, by adding some other lines of code!
Sources
Sélim HAMIDOU