I created a new Salesforce Inspector with Lightning Web Components
Ok, the title could be confusing because, at this time, there is still a lot to do to get a new Salesforce Inspector. But I am proud of this development because it handles data upsert really well, and I know that It has some room for improvement!

Step 1: HTML
This part will be the skeleton of our LWC. It’s completed now, but the important here is that the components I am using are simply: a lightning combobox as a picklist, a lightning file upload to handle the file uploadings, and a lightning button to allow the user to click on “Upsert records”. We will simply use these elements from javascript to get(or give, following the case) some information. These elements will be inside a Lightning card, but this is just for presentation purposes. And we also use SLDS classes to give our Lightning Web Component a more attractive appearance.
<template>
  <lightning-card>
    <div slot="title" class="slds-m-left_small">Upsert Records</div>
    <div class="slds-m-around_medium">
      <div class="slds-m-left_small slds-m-around_small">
        <!--Picklist-->
        <lightning-combobox
          label="Select Object"
          default="Select Object"
          value={selectedObject}
          options={objectNamesForPicklist}
          onchange={getSelectedObject}
        ></lightning-combobox>
      </div>
      <div
        class="slds-m-left_none slds-p-left_none demo-only demo-only--sizing slds-grid slds-wrap"
      >
        <div
          class="slds-m-left_none slds-p-left_none slds-col slds-size_2-of-3"
        >
          <div
            class="slds-m-left_none slds-p-left_none slds-box_x-small slds-text-align_center slds-m-around_small"
          >
            <!--File upload component-->
            <lightning-file-upload
              label="Upload CSV File"
              accept={acceptedFormats}
              data-id="csv-file"
              onuploadfinished={handleFileInputChange}
            >
            </lightning-file-upload>
          </div>
        </div>
        <div class="slds-col slds-size_1-of-3 .slds-is-relative">
          <div style="position: relative; top: 2.9rem; left: 0rem; border: 0px">
            <!--Upsert records button-->
            <lightning-button
              label="Upsert Records"
              variant="brand"
              onclick={handleUpsert}
            ></lightning-button>
          </div>
        </div>
      </div>
    </div>
  </lightning-card>
</template>
Step 2: JavaScript
Here, the difficulty for me has been handling the uploaded csv file. My goal was to use the FileReader object to read the CSV and then send it to my Apex method. Unfortunately, it didn’t work, and while trying to find the reason, I discovered that the file was not recognized as a real file by the navigator. So, I have chosen something simpler but heavier in resources: I’ve gotten the file Id, and I’ve given it to the apex class, which has to perform a SOQL query to get the actual csv content.
import { LightningElement, wire } from "lwc";
import { ShowToastEvent } from "lightning/platformShowToastEvent";
import getObjectApiNames from "@salesforce/apex/UpsertRecordsHandler.getObjectApiNames";
import UpsertRecordsFromCSV from "@salesforce/apex/UpsertRecordsHandler.UpsertRecordsFromCSV";

export default class UpsertRecords extends LightningElement {
  objectNames = []; //We define a list. It will get all the object names for the "Select Object" picklist
  errorOnGettingObjectNames; //This variable will be useful if we encounter an error by trying to get the object names
  errorOnUpsert; //Same, but for the upsert

  get acceptedFormats() {
    //At this time, we are only accepting csv files, but who knows?
    return [".csv"];
  }

  csvFileId; //This variable will be given to the UpsertRecordsFromCSV method, which will query the actual csv, then, will manipulate it, and upsert some records
  selectedObject = "Account"; //When the page loads, the selected object of the picklist is "Account", but it can change on the onchange event

  getSelectedObject(event) {
    this.selectedObject = event.target.value; //When the user changes value, we save the new value inside the selected object variable
  }

  get objectNamesForPicklist() {
    //Picklists in LWC need a list of objects to work. So, when we receive data on object names, we will handle the list to be able to display it on our picklist
    //getter mehods are reactive
    return this.objectNames.map((str) => ({ label: str, value: str }));
  }

  @wire(getObjectApiNames) //With this method, we call the getObjectApiNames apex method, and we get all the object names of the org
  wiredNames({ error, data }) {
    if (data) {
      this.objectNames = data;
      this.errorOnGettingObjectNames = undefined;
    } else if (error) {
      this.errorOnGettingObjectNames = error;
      this.objectNames = undefined;
    }
  }

  handleFileInputChange(event) {
    //When the user uploads a file on our LWC, we get its Id. It will be used on the UpsertRecordsFromCSV method
    this.csvFileId = event.detail.files[0].documentId;
  }

  handleUpsert() {
    //When the user clicks on "Upsert", we:1)Call the UpsertRecordsFromCSV, and 2)show a message on the screen
    UpsertRecordsFromCSV({
      sObjectName: this.selectedObject,
      csvFileId: this.csvFileId
    })
      .then((result) => {
        const success = new ShowToastEvent({
          variant: "success",
          title: "Success",
          message: "The upsert worked!"
        });
        this.dispatchEvent(success);
      })
      .catch((error) => {
        this.errorOnUpsert = error;
        const failure = new ShowToastEvent({
          variant: "error",
          title: "Error",
          message: "The upsert didn't work!"
        });
        this.dispatchEvent(failure);
      });
  }
}
Step 3: Apex
The Apex class contains two methods: the first one, getObjectApiNames, is called by using the wire service(you can notice the cacheable=true) annotation, and the second one, UpsertRecordsFromCSV, is called imperatively. We also could have used imperative callouts for getObjectApiNames, it would have given us more control over when we call Apex. The fact is that it’s not necessary. We just need the data to be gotten when the page loads. We don’t need for example to reload the data if the user clicks on a button.
public with sharing class UpsertRecordsHandler {
  @AuraEnabled
  //The method receives the object name from the LWC's picklist, and the uploaded CSV File Id
  public static String UpsertRecordsFromCSV(
    String sObjectName,
    String csvFileId
  ) {
    //We use the CSV File Id to query the uploaded document and its content
    String csvAsString = [
        SELECT Id, VersionData
        FROM ContentVersion
        WHERE ContentDocumentId = :csvFileId
      ][0]
      .VersionData.toString();
    //We define two lists: the first one is just the list of values as you would see it in Excel.
    //The second one is a list of all the indexes
    //We will increment on these two lists
    List<String> csvLines = csvAsString.split('\n');
    List<String> headers = csvLines[0].split(',');
    List<SObject> recordsToHandle = new List<SObject>();
    //Here we generalize the record's creation/updating: we create an instance of Schema.SObjectType,
    //and then we use the newSObject method
    //if the LWC was only for the Accounts, we would just use Account record = new Account()
    //But we can't here
    Schema.SObjectType objectType = Schema.getGlobalDescribe().get(sObjectName);
    //Two for loops: the first one is to increment in the records, and the second one is to increment in the different fields of the csv file
    for (Integer i = 1; i < csvLines.size(); i++) {
      SObject record = objectType.newSObject();
      List<String> values = csvLines[i].split(','); //We define a list of all the values of each record
      for (Integer j = 0; j < headers.size(); j++) {
        record.put(headers[j].trim(), values[j].trim()); //The field names and the values have the same indexes, we just do the match here on our record
      }
      recordsToHandle.add(record); //We add the record to the list, to bulkify the upsert
    }
    try {
      upsert recordsToHandle;
      return 'Success';
    } catch (Exception e) {
      return 'Error: ' + e.getMessage();
    }
  }
  //This method's role is to get a list of all the API names of the org and to give it to the LWC
  @AuraEnabled(cacheable=true)
  public static List<String> getObjectApiNames() {
    List<String> objectApiNames = new List<String>();
    for (Schema.SObjectType objectType : Schema.getGlobalDescribe().Values()) {
      //We increment in Schema.getGlobalDescribe().Values()
      objectApiNames.add(objectType.getDescribe().getName()); //We get the name for each object, and save it to a list
    }
    objectApiNames.sort(); //When we've treated all the objects, we sort the list, to get ordered values on the picklist
    return objectApiNames; //We return the list to the LWC
  }
}
Step 4: The LWC Meta file
Here is the configuration I used to display this Lightning Web Component on my Salesforce organization. It’s up to you to modify it, to suit your needs.
<?xml version="1.0" encoding="UTF-8"?>
<LightningComponentBundle xmlns="http://soap.sforce.com/2006/04/metadata">
    <apiVersion>53.0</apiVersion>
    <isExposed>true</isExposed>
    <masterLabel>Upsert records</masterLabel>
    <targets>
        <target>lightning__HomePage</target>
    </targets>
</LightningComponentBundle>
Now, you can see the result:
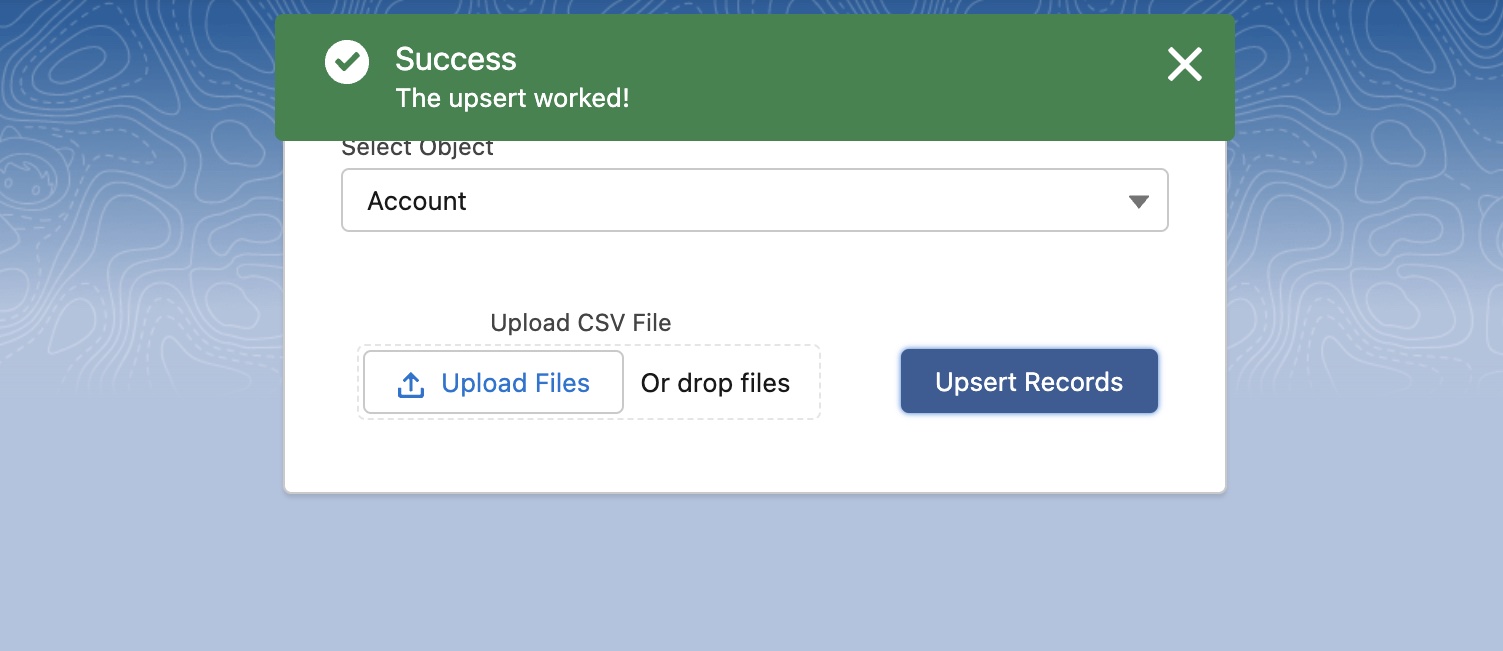
Sélim HAMIDOU