I've integrated Spotify with Salesforce to know what song is currently playing.
Hi! Ok, how many of you are using Spotify to listen to music? I think I may be a whole new level of a nerd, so, as a developer, I am spending A LOT of time coding while listening to music. Thinking about it, I could be scared about how much time I am on Spotify. Every year, Spotify gives us some statistics about our favorite artists, our favorite songs, and the number of hours we used Spotify...And that's terrifying. I should spend more time on Salesforce and less on Spotify, isn't it?
I am using the present time to talk about it, but honestly, it's past now! I've developed a solution that will allow me to spend AT LEAST 5 MINUTES A YEAR on Spotify. How is this even possible???
It's possible by integrating Spotify with Salesforce. Imagine something: You are working on an Opportunity, you are really close to closing it, and suddenly, you hear that music. You love this song. You think about it. You move from Salesforce to Spotify. Boum. You lost.
I don't want this. So, as you can guess, my need was to develop a solution to get some information about the current song just right here on Salesforce. It was the first need. My second need was just to keep is extremely simple. So, no additional library to add, no webhook neither. So, now that we know what we want, let's move to the first part: the foundations!
Foundations: how to allow Salesforce to communicate with the Spotify API
To make an API callout, we don't have a lot of choices. Either we use remote site settings and custom metadata types, or we use named credentials. One of the advantages we would have by using named credentials is that we will have a lot less maintenance work. To be honest, using named credentials is a little bit longer than using remote site settings, but the callout is done a lot more smoothly. And also, if your token changes at a time, it's automatically handled by named credentials! So, did I convince you?
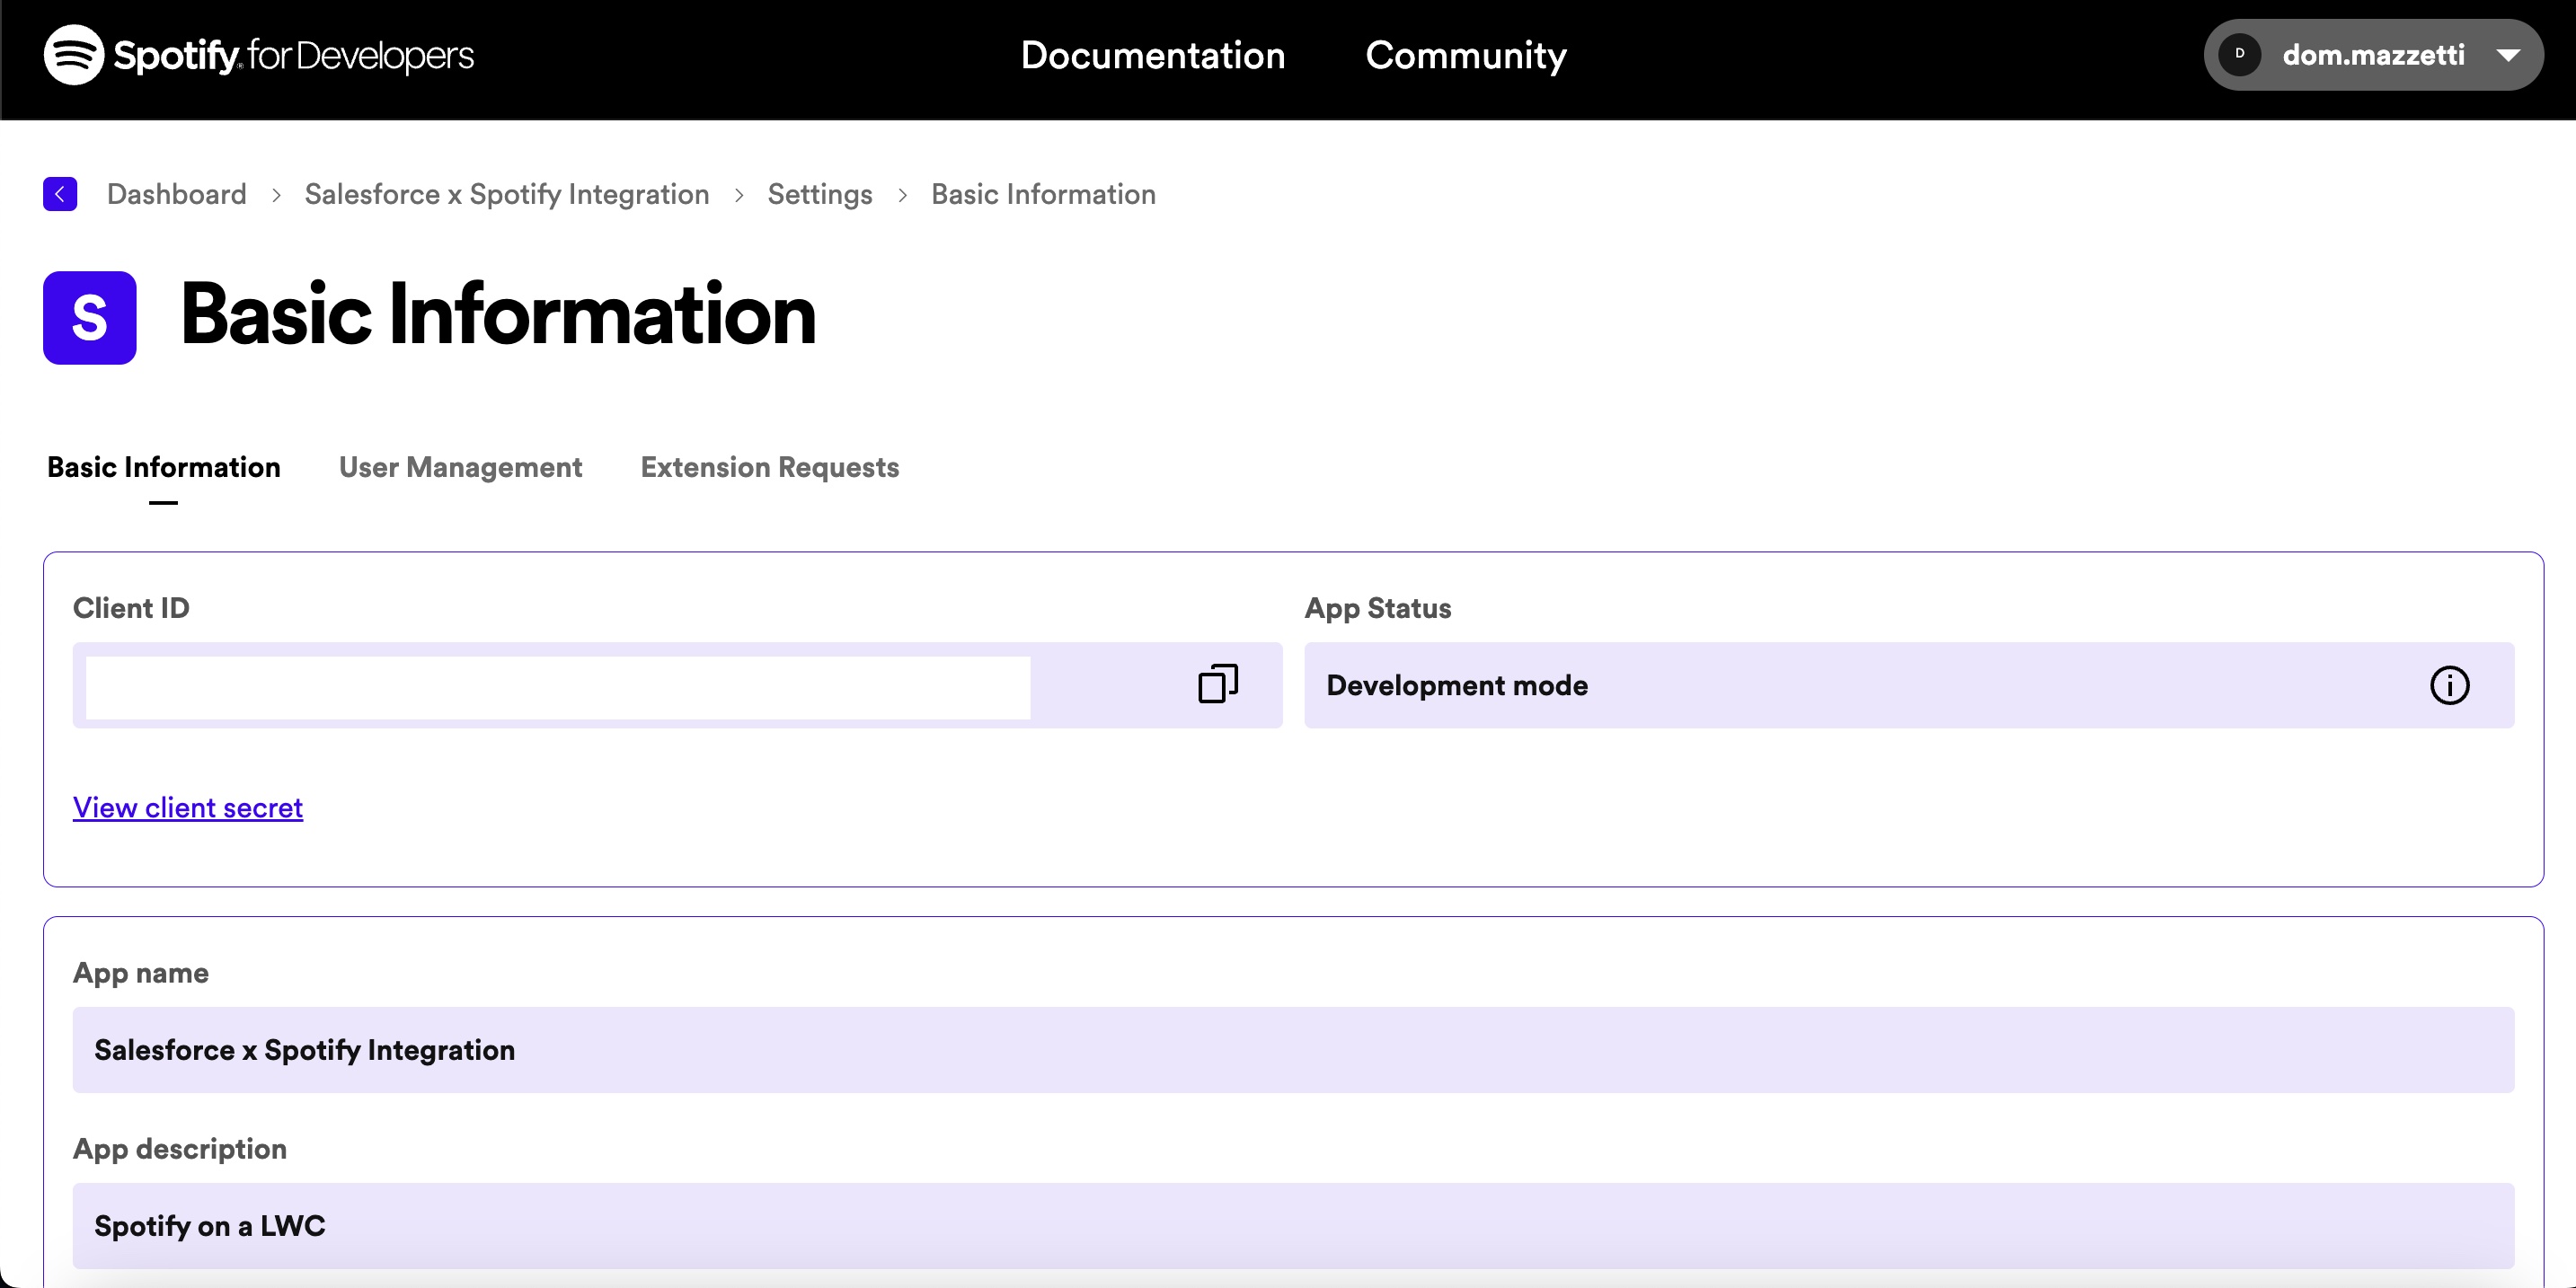
Now that we know how to handle the callouts, let's do it in practice. The first thing is to create a new app on the Spotify API. For this, we have to get a Spotify account and log in with it. It's not mandatory to be a premium account. In this step, the elements you have to keep in mind are the client secret, the client id, and the redirect URL. They will be used on our named credentials.
The named credentials can look impressive at first, but it really isn't, trust me. The first thing to do here is to create an Authentication provider, by going to Setup -> Auth. providers. You can fill in the informations as it is on the image, and by adding your personal Consumer key(ie Client ID on Spotify) and Consumer secret(Client Secret on Spotify).
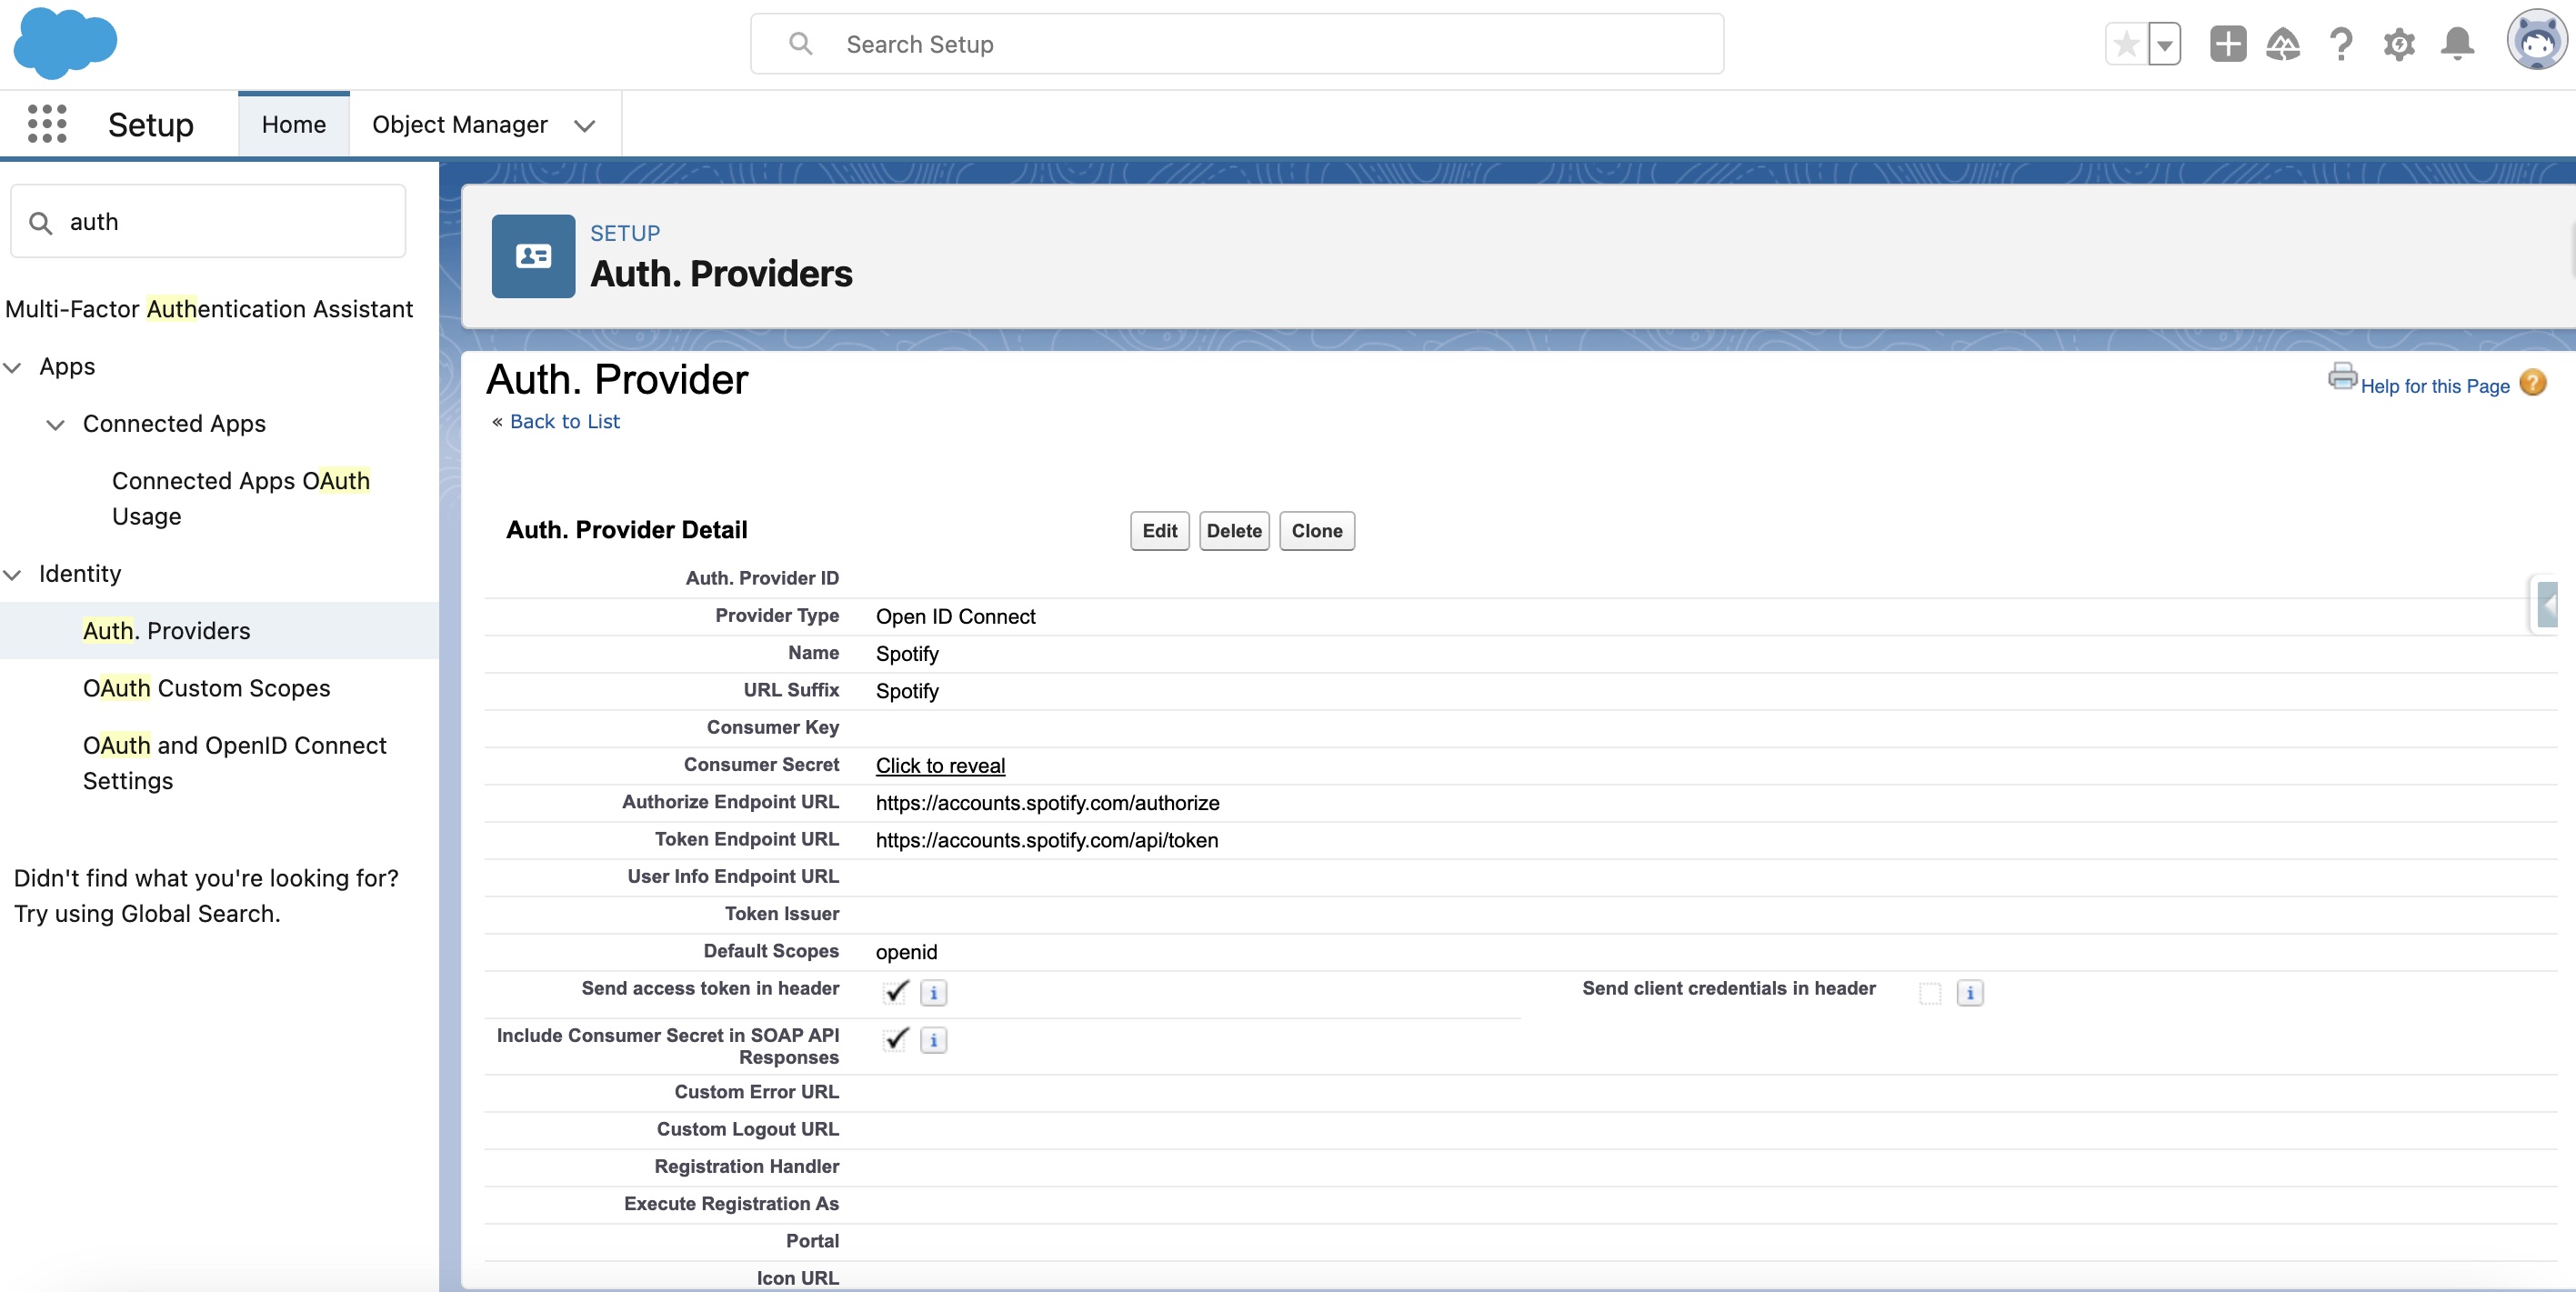
After you save your new Authentication Provider, you can notice some URLS at the bottom of the page. They are generated by Salesforce itself, and you will need the one called "Callback URL". So, copy it, go back to the Spotify dashboard, and paste it into the Redirect URIs section.
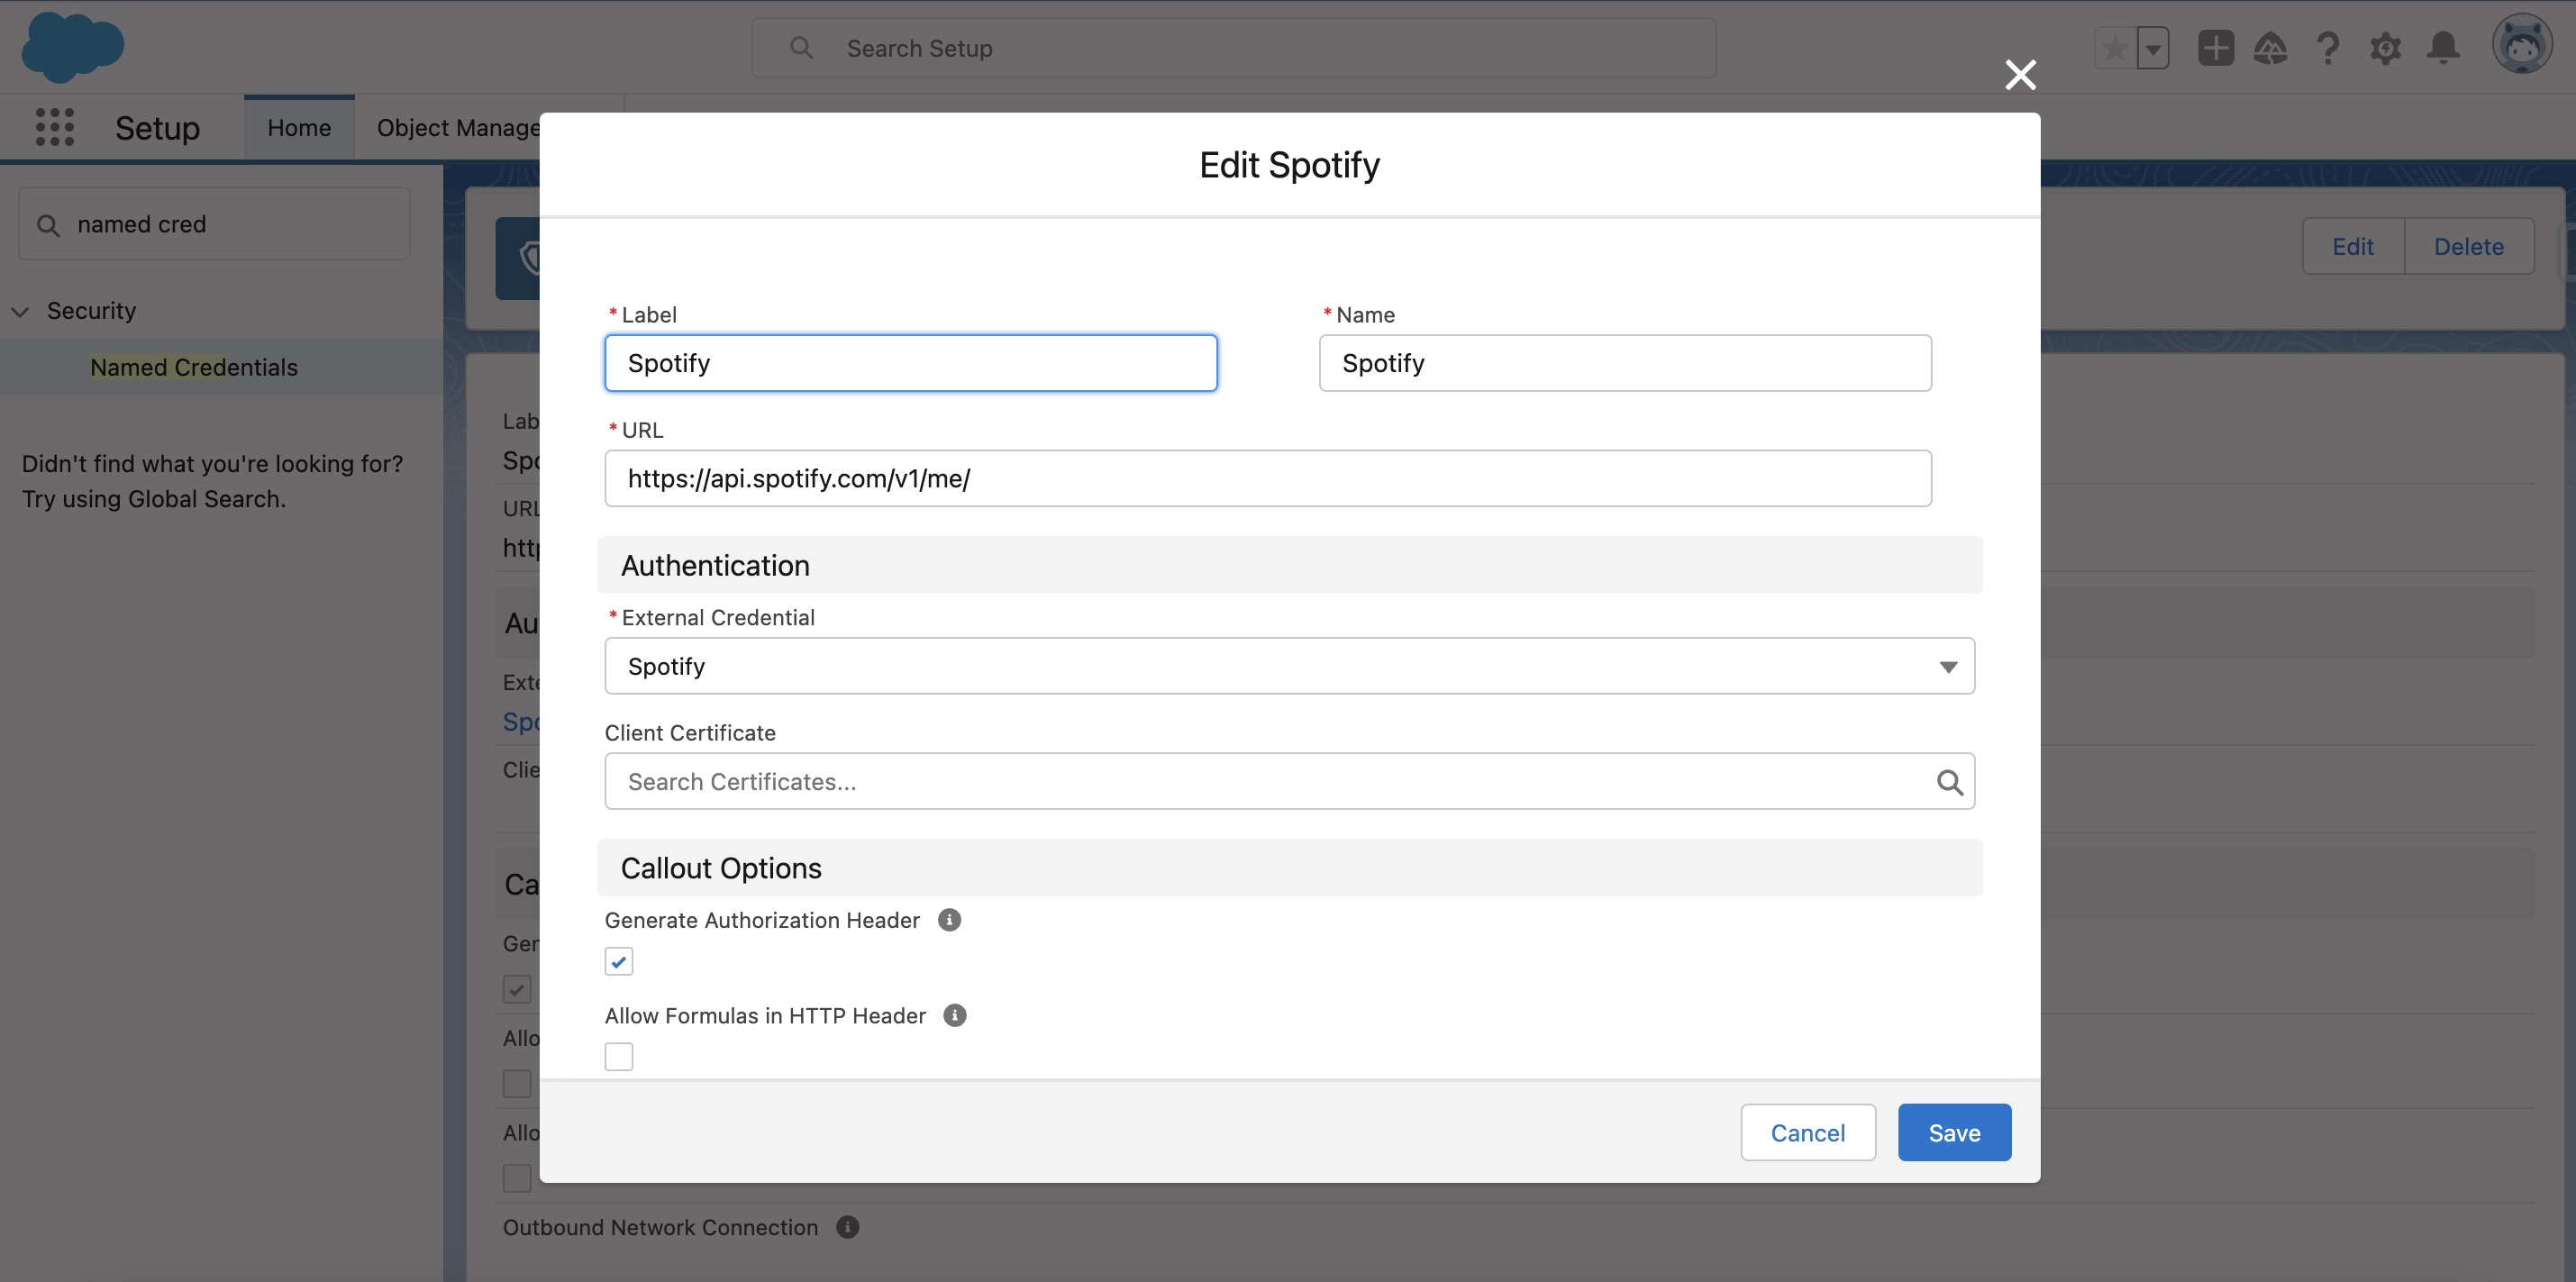
Now you go again to Salesforce, and search "Named credentials" on the Quick Setup. Then, click on External Credentials, to create a new External Credentials.
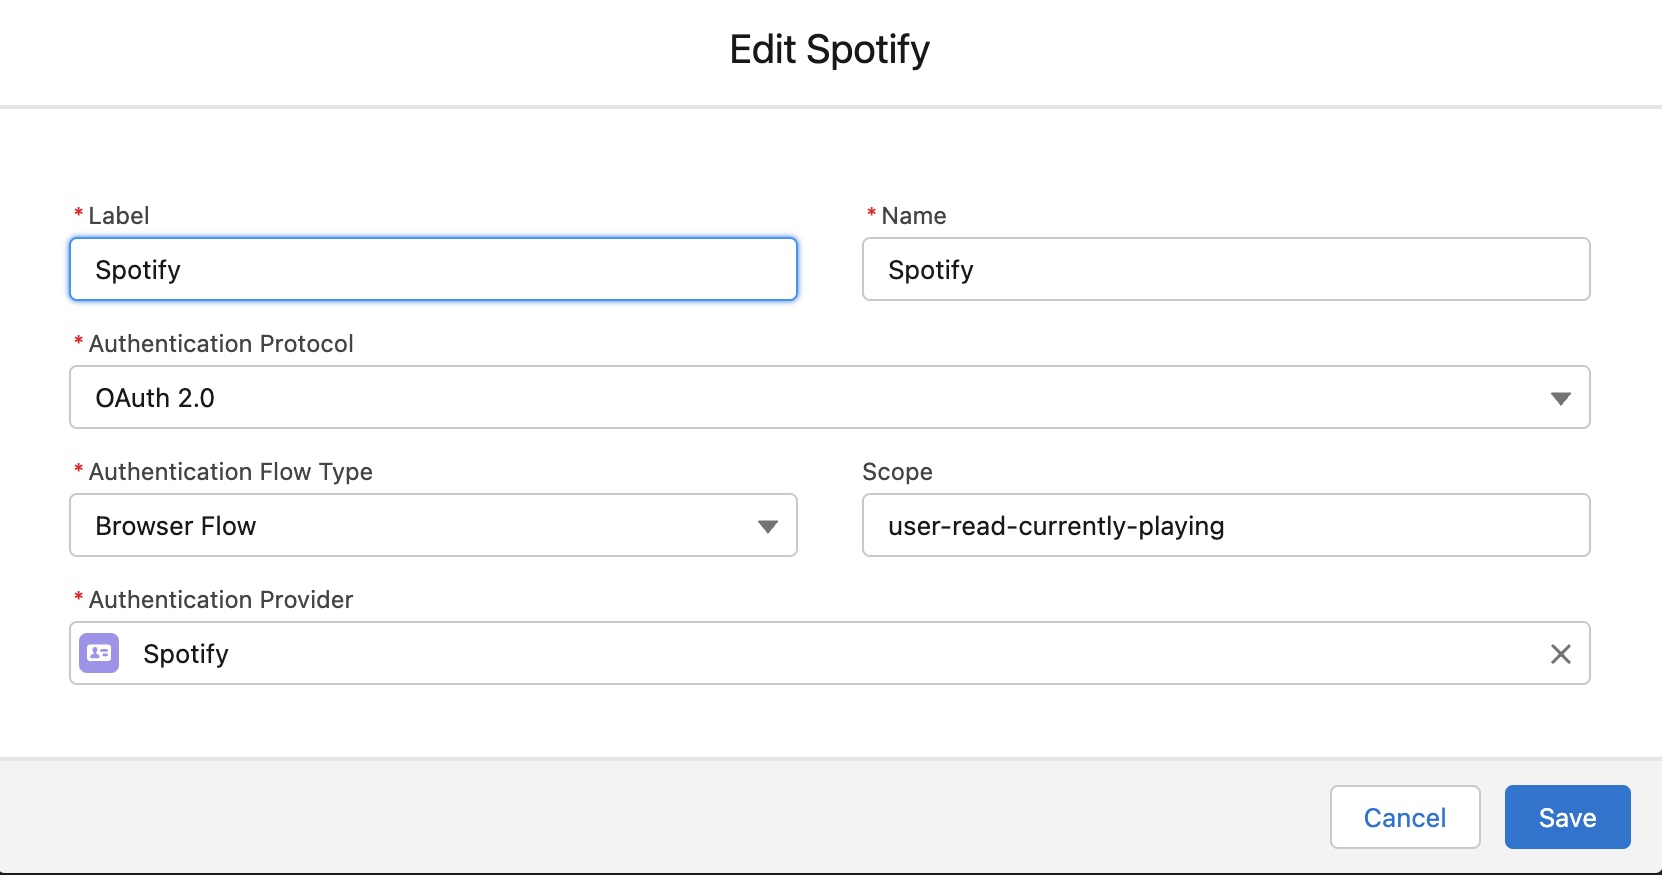
When it's done, you create new Named credentials in the corresponding section. We are connecting to Spotify with OAuth, so you select OAuth2.0 for the authentication protocol. You also select Browser flow for the "Authentication flow type". The Authentication provider has also to point to the auth. provider you have created previously.
And now, what is the scope? Well, this field is very important, because it will authorize us to get the currently played song, or change the volume, or even add some titles to a playlist, or everything you can do with an API. In a few words, the scope determines the level of rights we have on an API.
Sometimes, we also have to fill the scope field on the API provider, but it’s not the case here. In our case, we just need to get some data about the currently played song, so “user-read-currently-playing” will be enough for our use. But it’s totally up to you to do something else with this API, and in that case, you would need to add some scope(just don’t forget to separate every scope with a space, like this: “myScope1 myScope2”.</p>
So, now it should be working, isn't it? Let's try.
HttpRequest req = new HttpRequest();
req.setEndpoint('callout:Spotify/player/currently-playing');
req.setMethod('GET');
req.setHeader('Content-Type', 'application/json');
Http h = new Http();
HttpResponse res = h.send(req);
And we get...this.
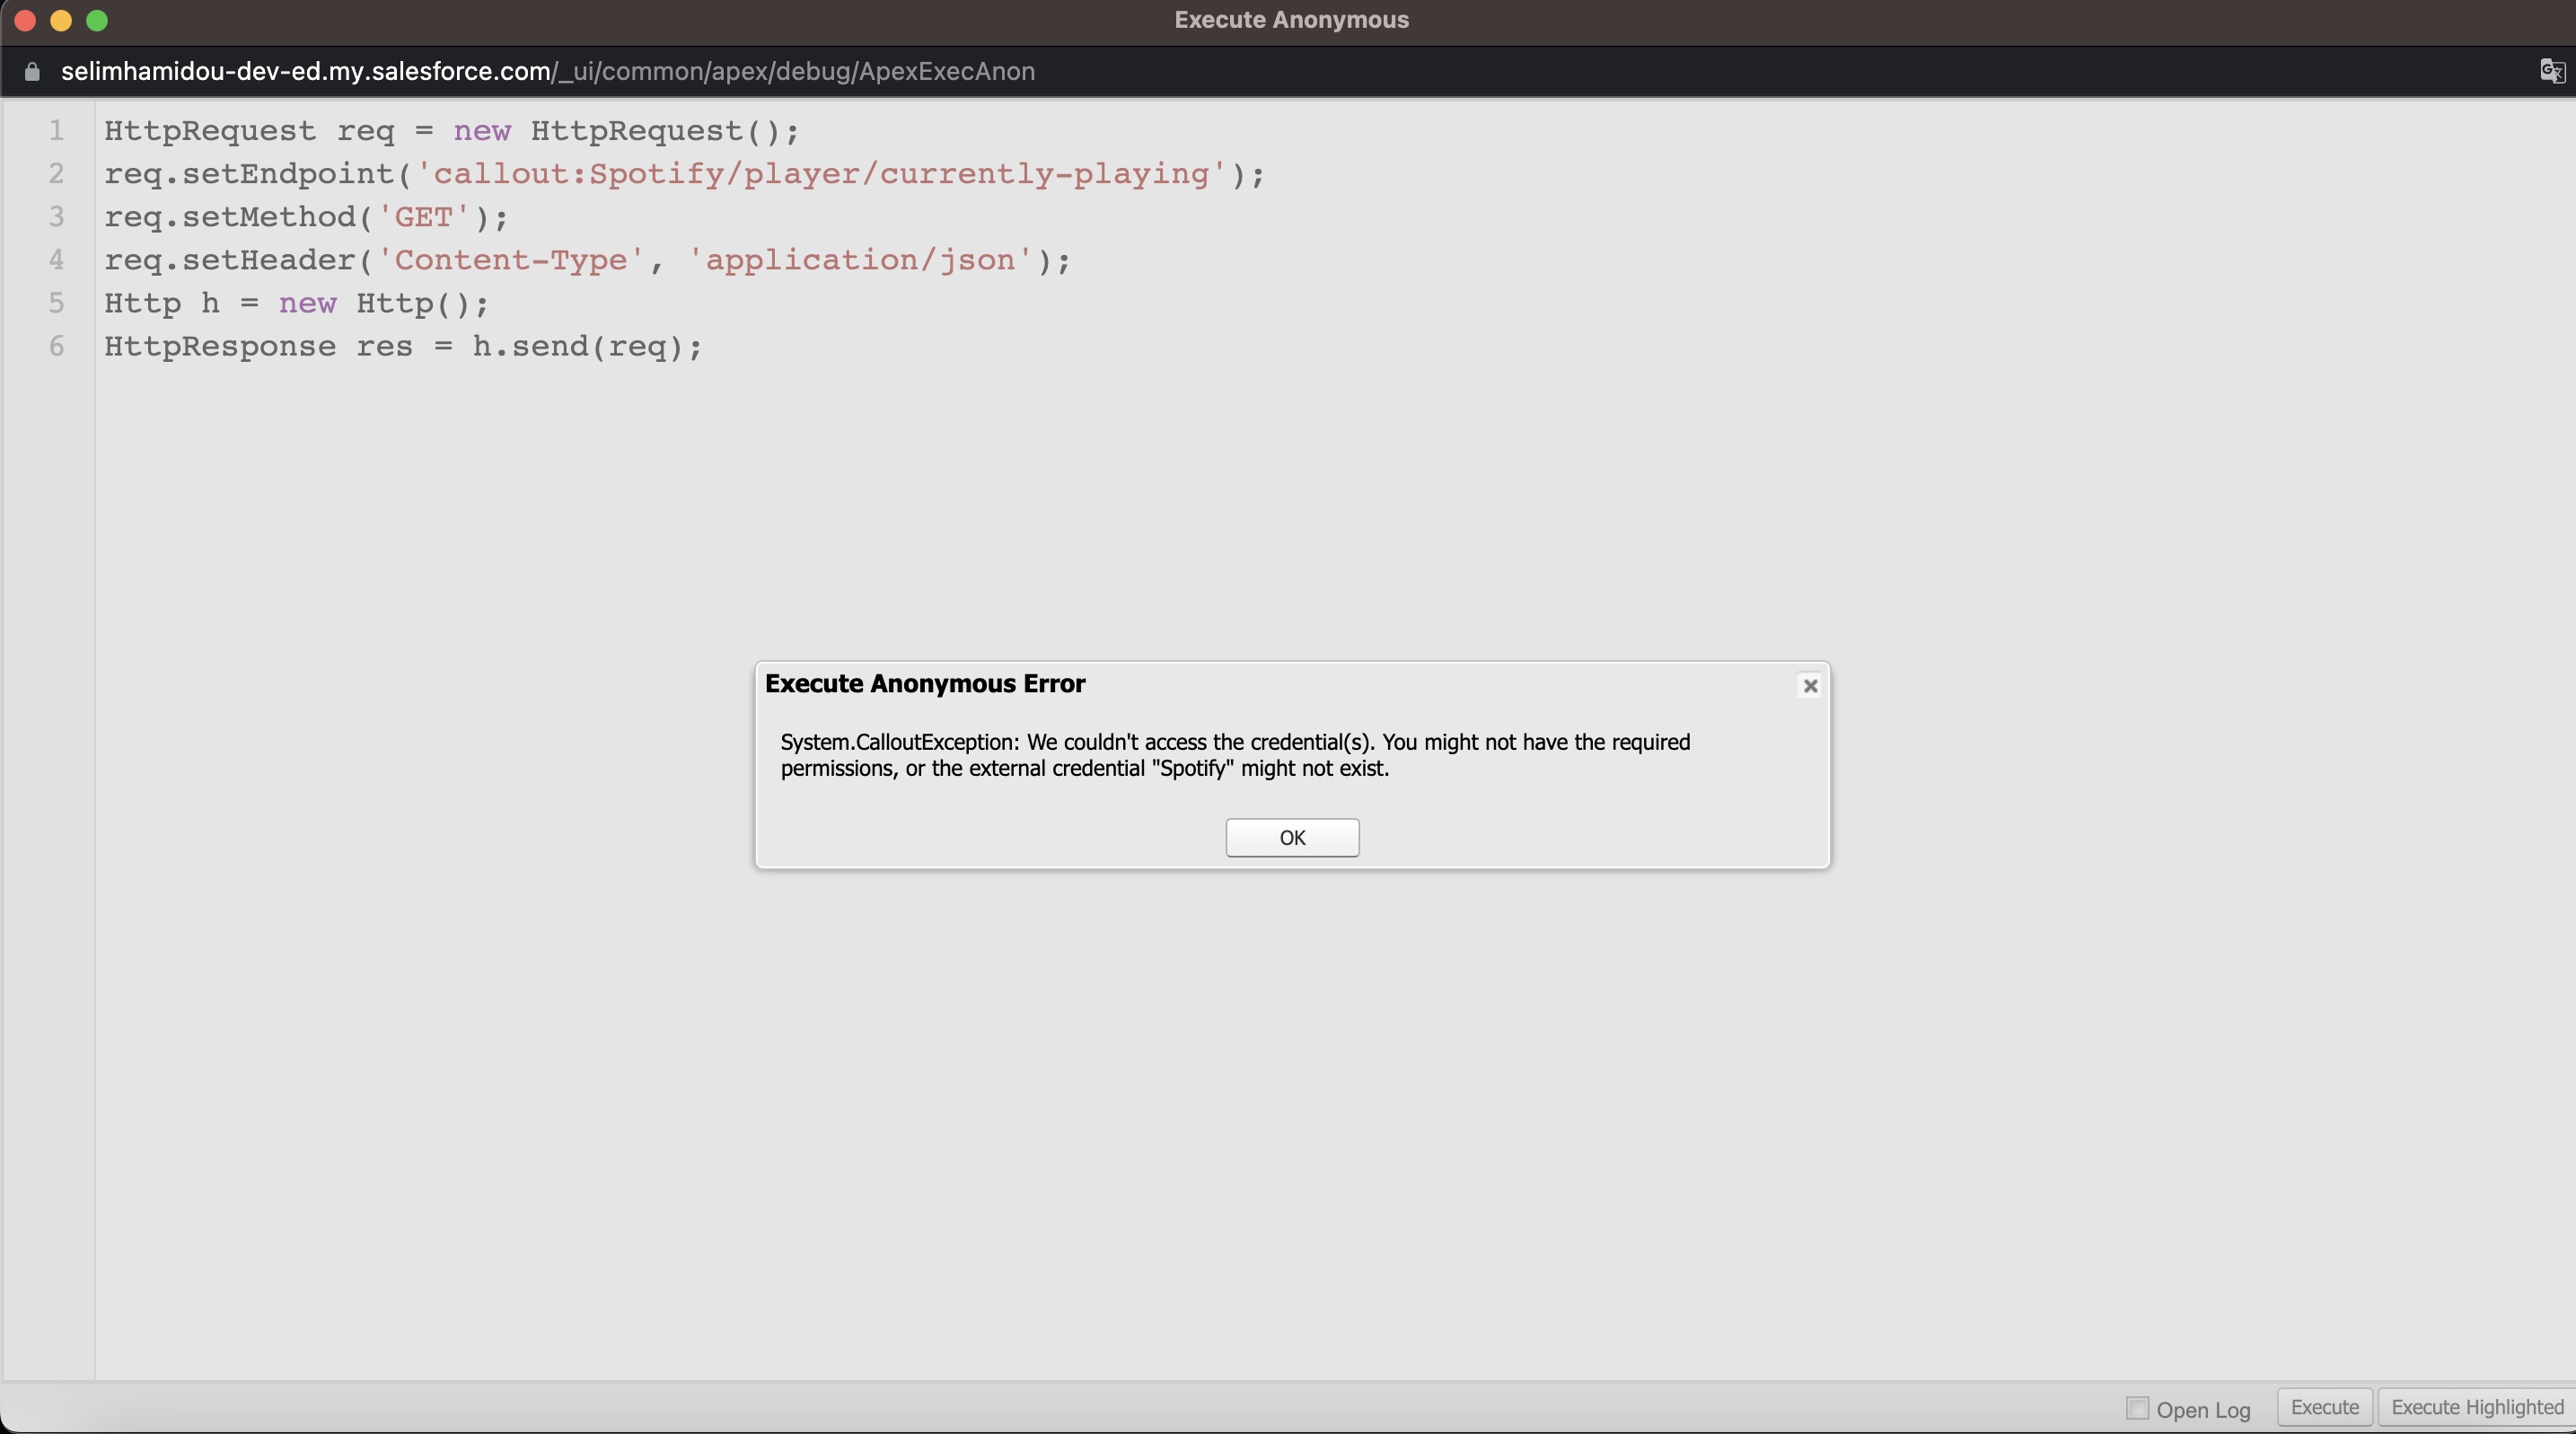
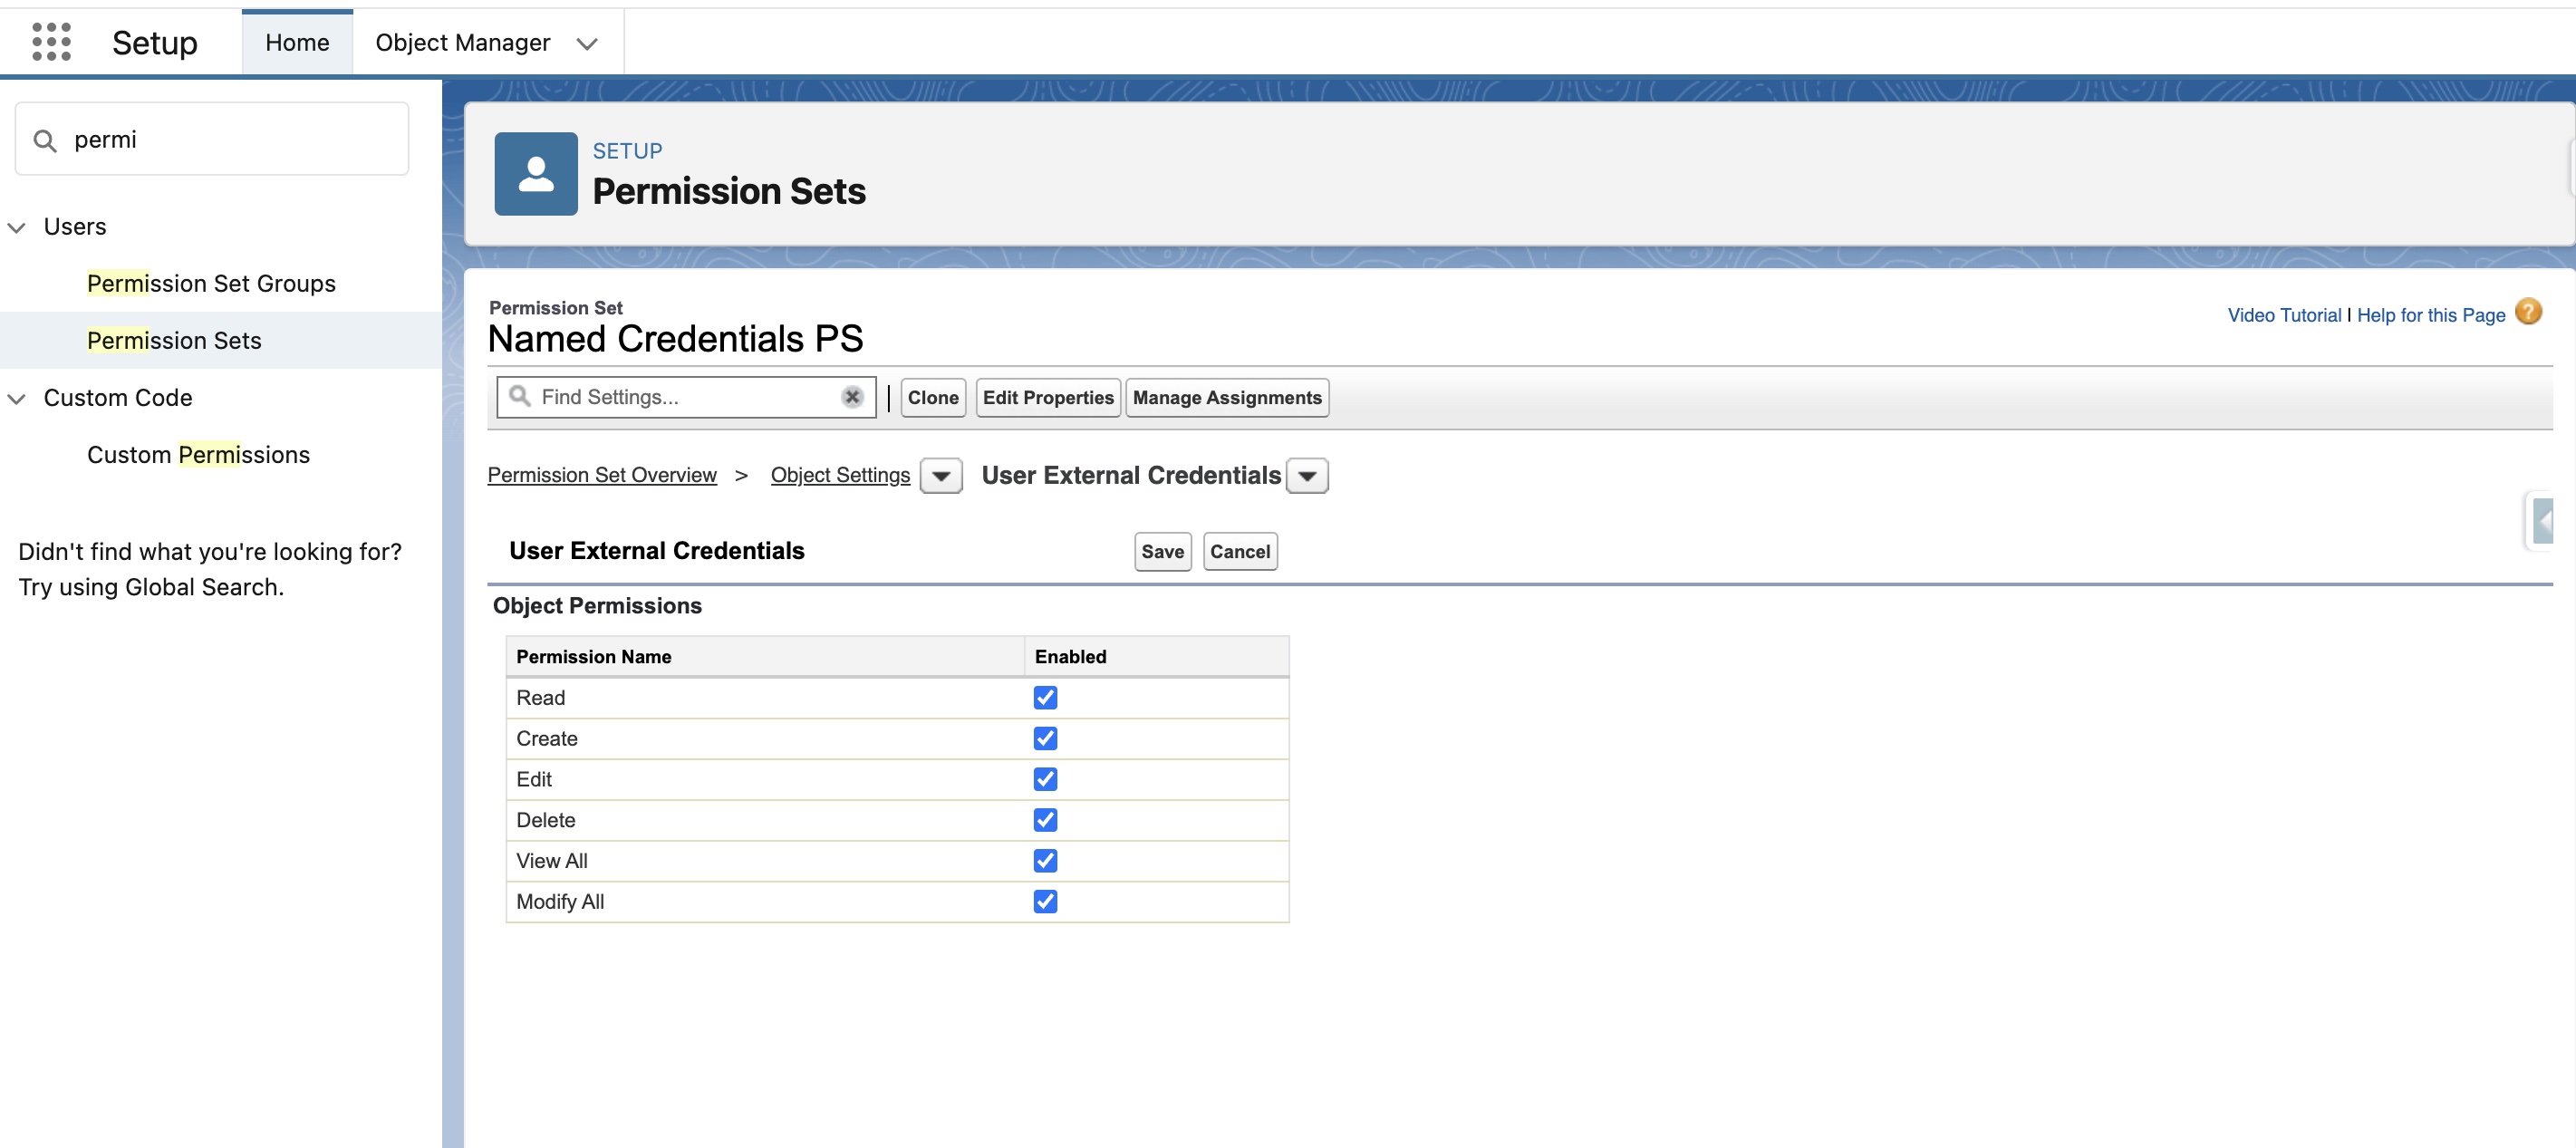
It's not working! Why? It's because we have forgotten to add a permission set. And also because we didn't authenticate yet. So, on our named credential, we click on "New permission set". We call it "Named Credentials PS", but it's as you want. On it, we go to the User External Credentials object, and we add all the rights we can!
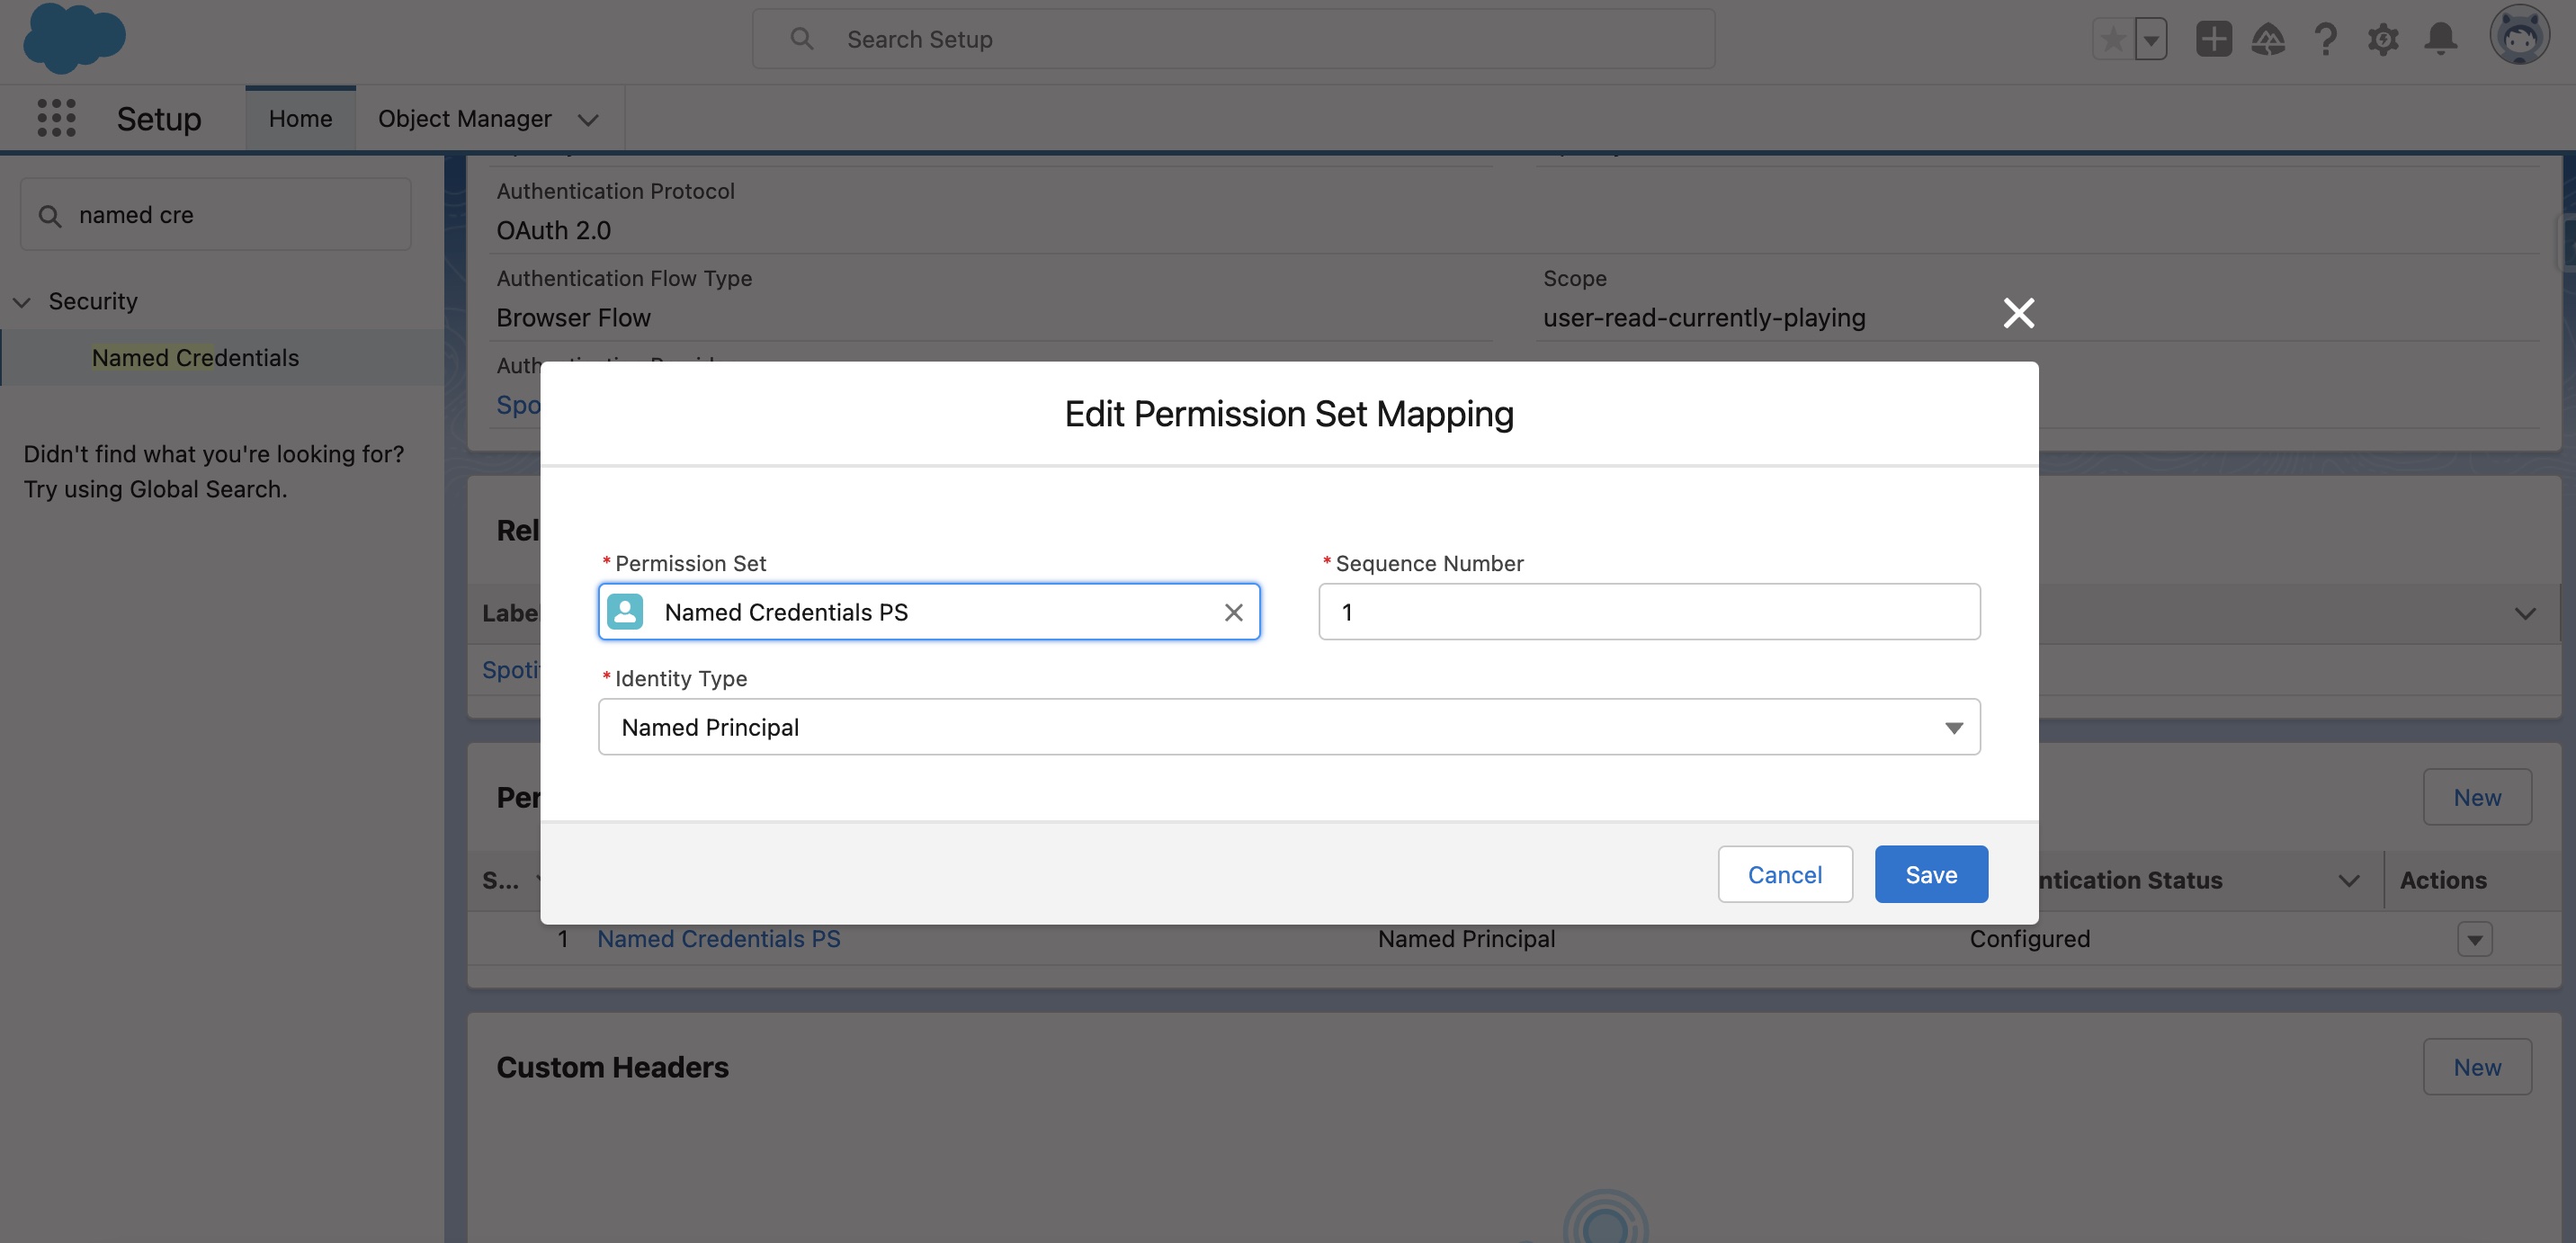
When it’s done, we assign this permission set to the running user(me in my case), and we go back to the Spotify external credential. We create a new Permission Set Mapping with the newly created permission set, and we click on Authenticate.
At this moment, you will be redirected to a Spotify webpage, asking you if you authorize your Spotify app to access some of your personal information (defined by the scope). It’s in French on the image, and the rights asked are not the same, but it’s just to show you basically what you have to get.
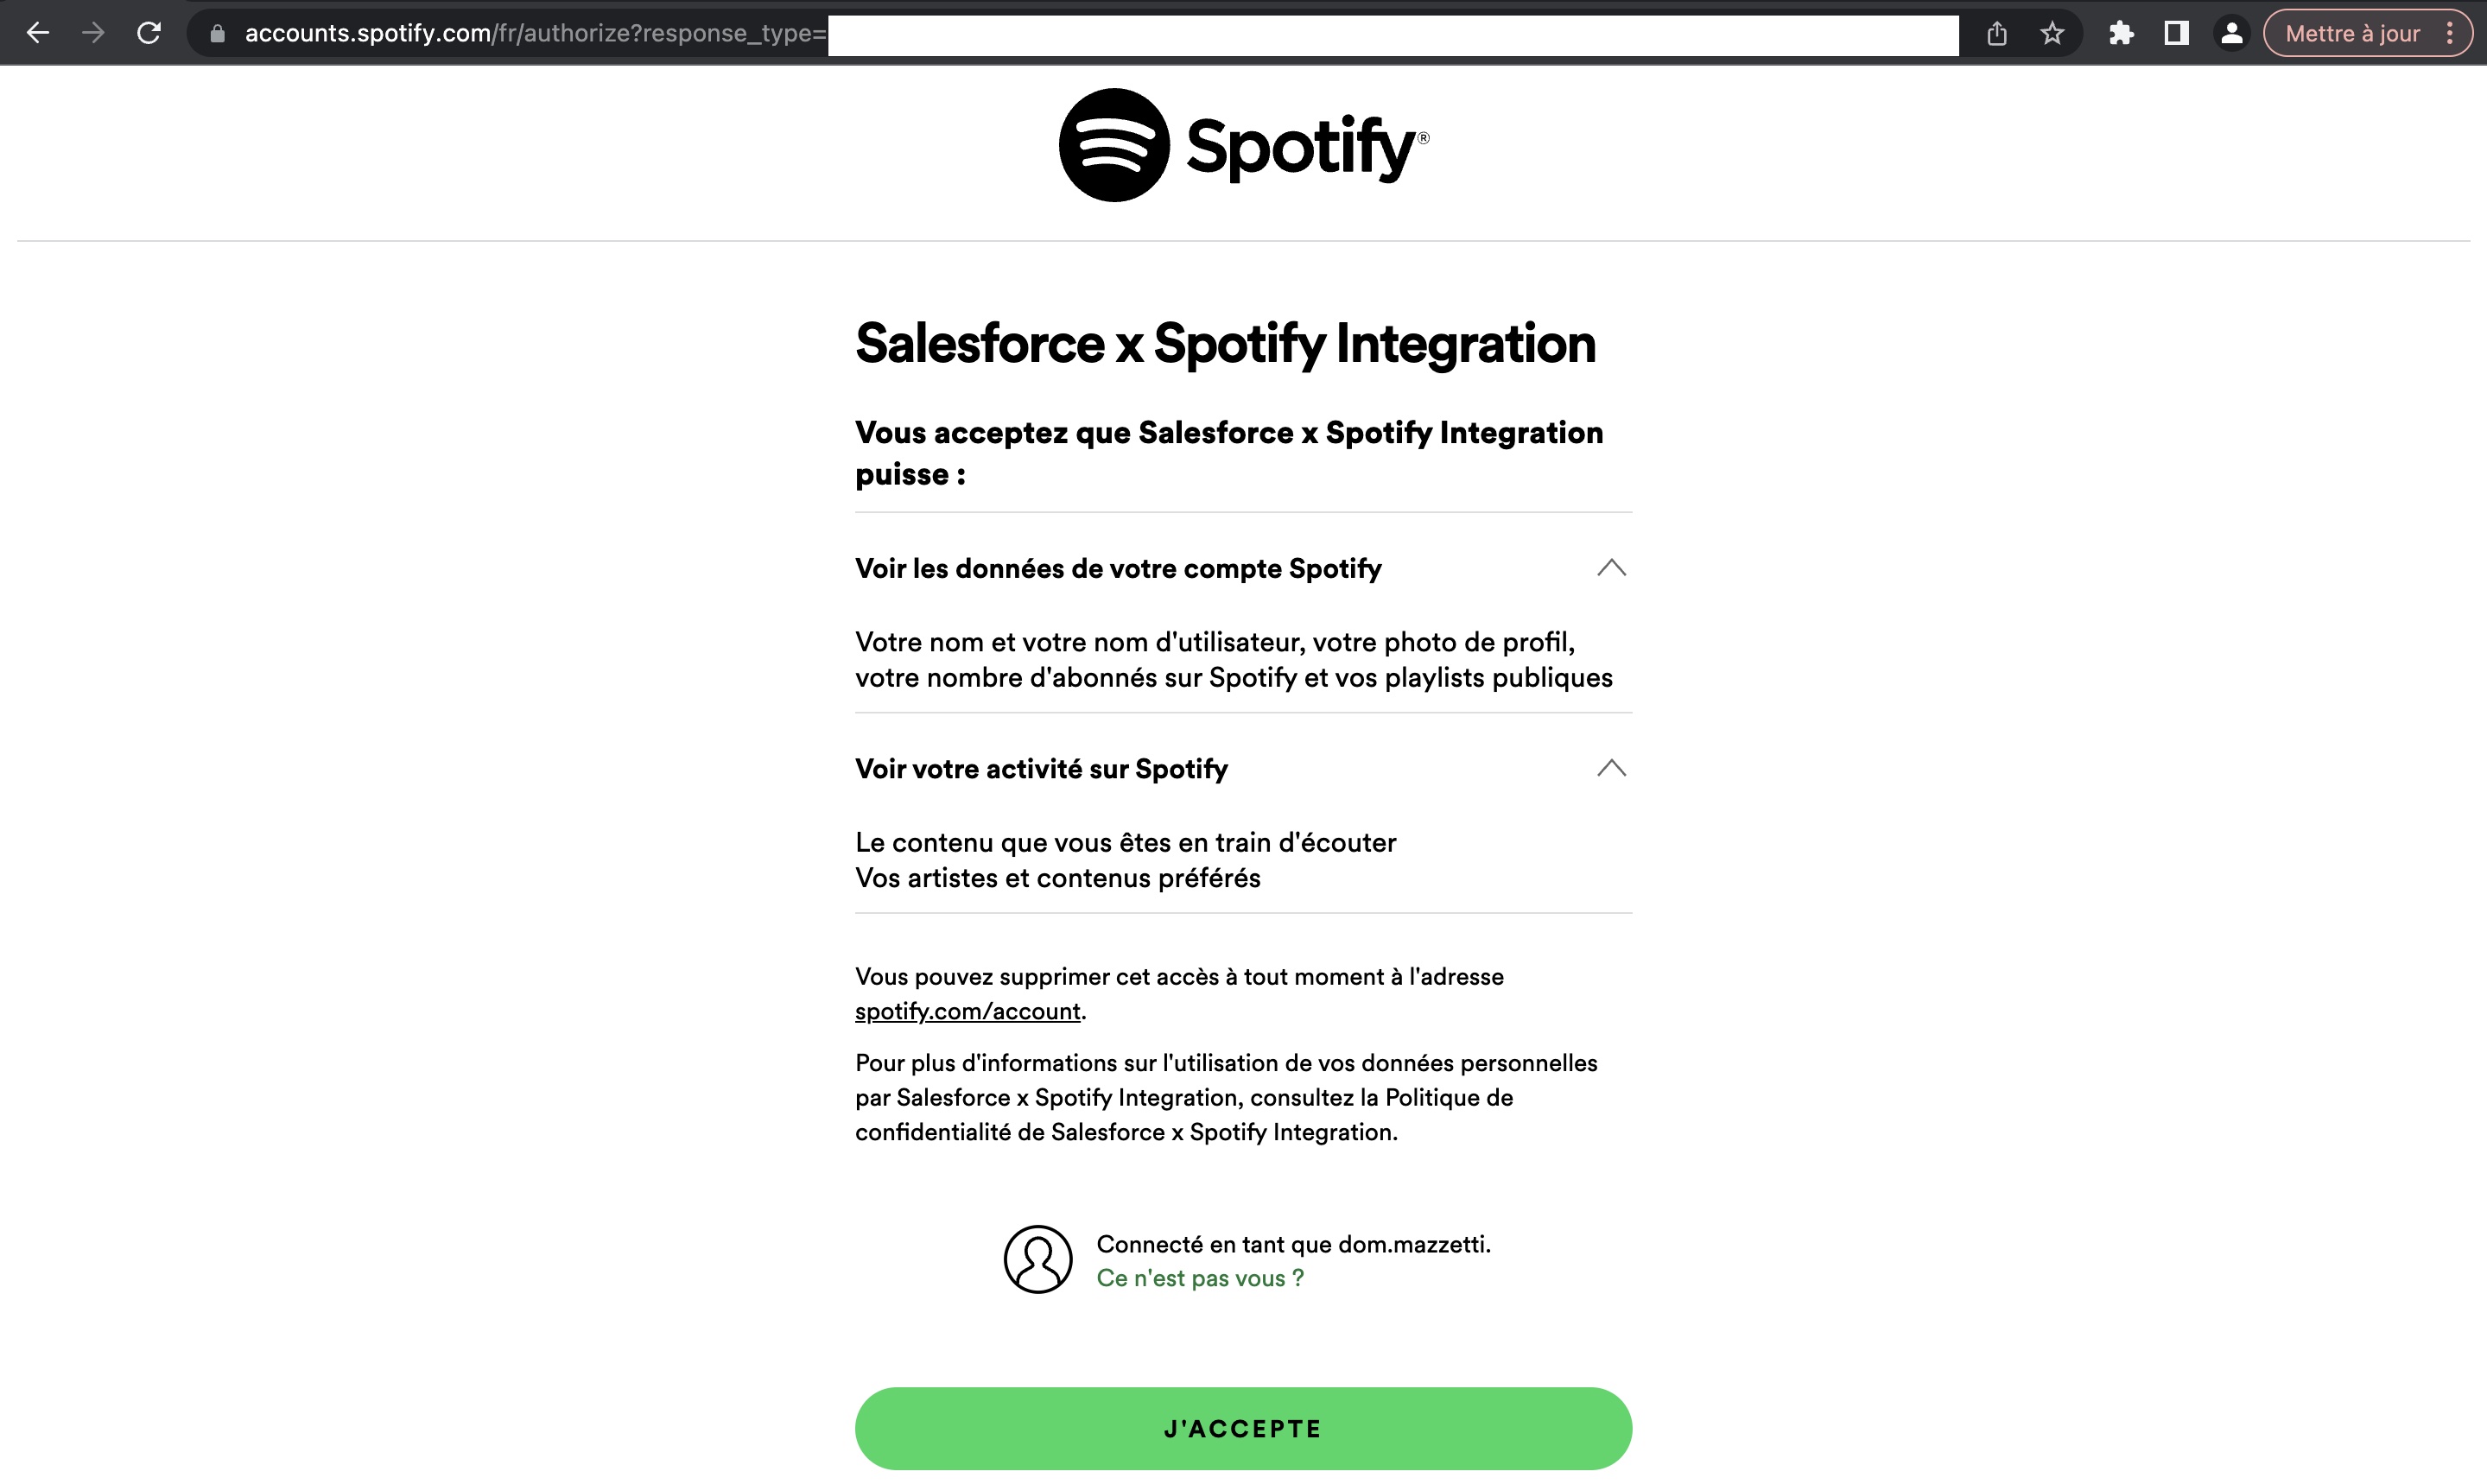
When you say yes, if you followed all of the steps, you must be redirected to your Salesforce organization, and see a green message on the screen! That’s really great news, we can now move on to the code!</p>
Calling Spotify API with Apex
Now that everything is in place, it's really easy to call Spotify. We need almost one line of code to do the callout, the other lines only exist to transform the brut response we get into something we can reuse on our Lightning Web Component.
public with sharing class spotifyIntegrationHandler {
  public static Map<String, String> callSpotifyAPI() {
    //dataToSendToLWC is used to store the data we want to give to the LWC(ie the album picture, the artist's name, and the music's name)
    Map<String, String> dataToSendToLWC = new Map<String, String>();
    //Here we don't have a lot of work. Our credentials have been defined with the named credentials
    HttpRequest req = new HttpRequest();
    //The Currently-Playing Spotify API gives us the currently played song
    req.setEndpoint('callout:Spotify/player/currently-playing');
    req.setMethod('GET');
    req.setHeader('Content-Type', 'application/json');
    Http h = new Http();
    //We send the request, and we get a result
    HttpResponse res = h.send(req);
    //We have to transform the result's body into something we can use. We use the deserializeUntyped for this
    //And we get the data we want
    Map<String, Object> deserializedResult = (Map<String, Object>) JSON.deserializeUntyped(
      res.getBody()
    );
    Map<String, Object> item = (Map<String, Object>) deserializedResult.get(
      'item'
    );
    List<Object> artistsList = ((List<Object>) item.get('artists'));
    Map<String, Object> album = (Map<String, Object>) item.get('album');
    List<Object> imagesList = (List<Object>) album.get('images');
    //Here normally we would have to work on lists, with multiple images and artists(the featurings).
    //To simplify the problem, we just took the first element on these lists
    Map<String, Object> imageForCover = (Map<String, Object>) imagesList[0];
    Map<String, Object> artistObject = (Map<String, Object>) artistsList[0];

    //We store our data
    dataToSendToLWC.put('musicName', (String) item.get('name'));
    dataToSendToLWC.put('albumPhoto', (String) imageForCover.get('url'));
    dataToSendToLWC.put('artistName', (String) artistObject.get('name'));
    //We return the map
    return dataToSendToLWC;
  }
  //We call this apex method imperatively, so we don't need to add the cacheable=true annotation.
  //But "forgetting" it allows us to get noncached data everytime(ie new data at every callout)
  //It's important for us, to get the right song when Spotify API is called, and not an ancient one
  @AuraEnabled
  public static Map<String, String> getSongInformations() {
    return callSpotifyAPI();
  }
}
Getting the data into our LWC and handling the callouts
For this part, we simply used Javascript to make the link between Apex and the screen(I mean the HTML). To make the implementation easier, I didn't add some Spotify events to make it reactive to the player changes. I wanted something really simple, so I simply added the API callout to the setInterval method, to ask Spotify what is the current music playing every 30 seconds. It's not something great, as it's taking resources and as it's playing against daily limits(it depends on the version of Salesforce you have, but it should be around 15000/day). But it's working, and it's simple.
import { LightningElement, track } from "lwc";
//getSongInformations will be used to call the Spotify API
import getSongInformations from "@salesforce/apex/spotifyIntegrationHandler.getSongInformations";

export default class SpotifyPlayerLWC extends LightningElement {
  error; //We store the error on a variable
  @track song; //The song variable will be used on the template, to display the actual music we are playing
  //Here the track keyword is not mandatory. If you don't add it, it will work anyway, but adding it allows us to have a reactive variable

  //We call this method imperatively because it offers us more control. Also, if we used the wire service(so, with cacheable=true),
  //We couldn't get new data every time
  callSpotifyAPI() {
    getSongInformations() //We call the apex method
      .then((result) => {
        this.song = result; //Result is already in the right format. It's a map with the right keys and values, we directly store it in the song variable
      })
      .catch((error) => {
        this.error = error; //If we get an error, we want to store it somewhere
      });
  }

  //When the page loads, we call Spotify API for the first time. After it, we call it again, but now it's every 30000ms(ie every 30s)
  connectedCallback() {
    this.callSpotifyAPI();
    setInterval(() => {
      this.callSpotifyAPI();
    }, 30000);
  }
}
Handling what's on the screen with HTML and CSS
To be honest, this part almost took me more time than the other parts. I took time to think about what I wanted, and finally, I decided to present it like an album you are opening. So, here are the HTML and CSS files.
<template>
  <!-- We use song information here. lwc:if is the same as if:true.
   We use it to avoid an error message when song infos are not available, for any reason.
   You can try to remove the condition, to test  -->
  <template lwc:if={song}>
    <!-- On the envelope, we basically store two parts: the album picture on the left, and the song information on the right.
      We will define their positions on the CSS file -->
    <div class="envelope">
      <!-- Do not think about positions here. Positions are defined on the CSS file -->
      <!-- Left side -->
      <img class="imgcover" src={song.albumPhoto} />
      <!-- Right side -->
      <h1 class="song-info">
        You are listening to:<br />
        {song.artistName}, {song.musicName}.
      </h1>
    </div>
  </template>
</template>
/* The envelope is containing everything(ie the album photo and the songs information). It's a rectangle of 400px x 200px.
We keep it simple, paint it blank, and will add some elements inside it */
.envelope {
position: absolute;
left: 0px;
top: 0px;
height: 200px;
width: 400px;
background-color: white;
}
/* The image is on the left side. We define it as a square of dimensions of 200px x 200px */
.imgcover {
position: absolute;
left: 0px;
top: 0px;
height: 200px;
width: 200px;
}
/* We define the writing, but it's still up to you to modify it */
.song-info {
position: absolute;
top: 50px;
left: 210px;
font-family: "Open Sans", sans-serif;
font-size: 11pt;
font-weight: 600;
text-transform: uppercase;
color: black;
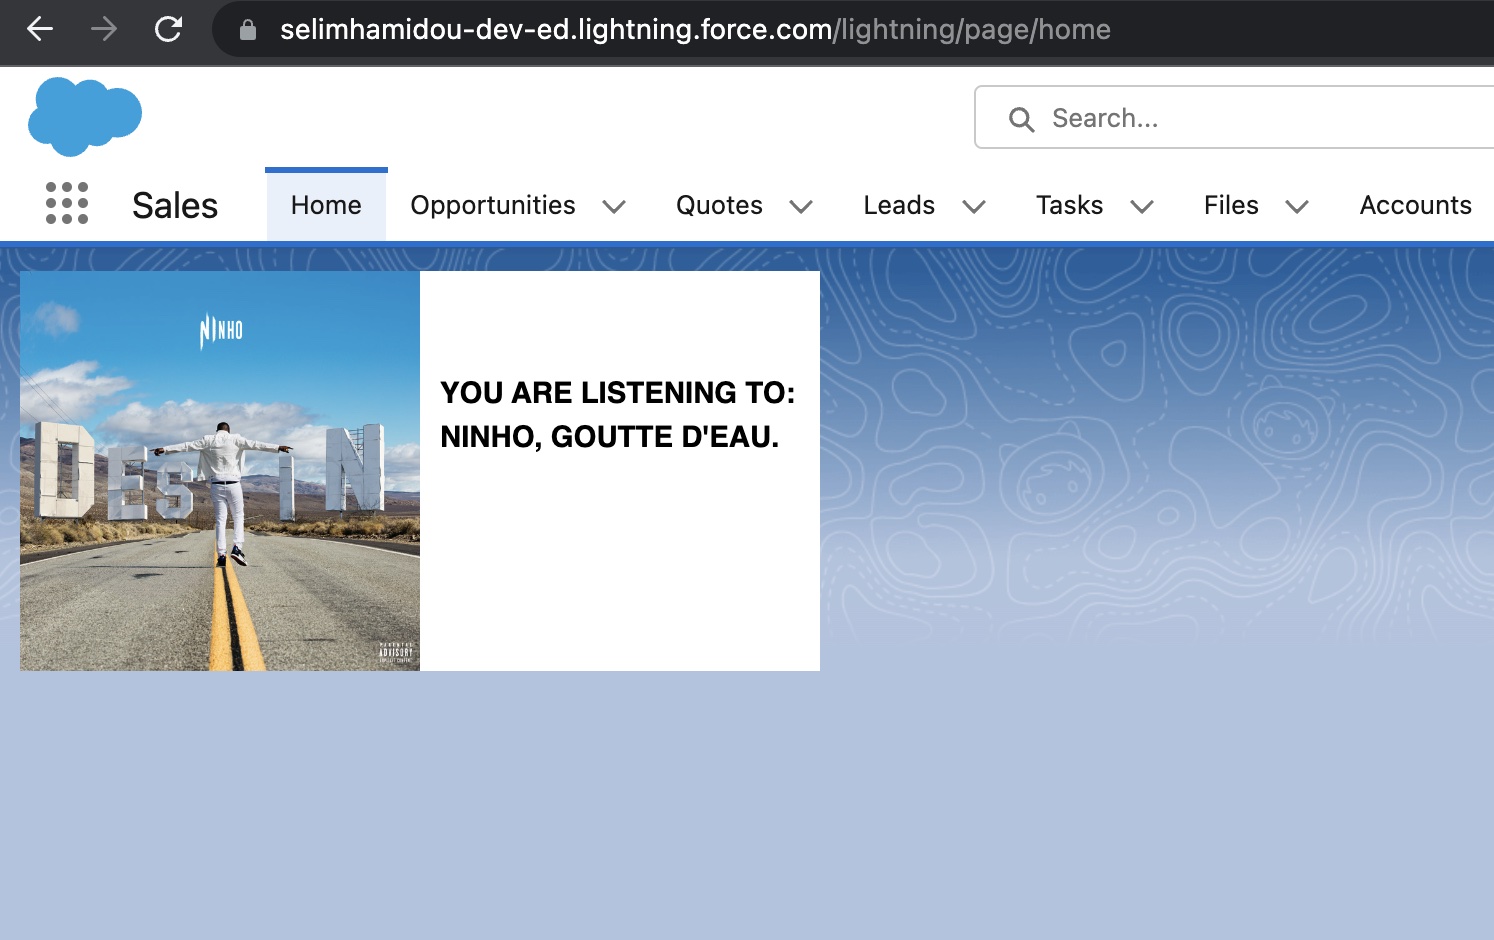
}The result
I wanted something simple and beautiful at the same time. I think that beauty is something really subjective, but I am still really proud of this component.
Sources
You can check these links, they are very useful:
Sélim HAMIDOU